IP Services
The Setup —> IP Services page allows you to add, delete and configure IP Services. The settings are organised into the following sections
Channel Details

A channel is a combination of a Virtual IP (VIP) and a TCP port that the jetNEXUS ALB-X will listen on. Traffic arriving at the channel is directed to one of the content servers that are associated with that channel. The virtual IP address cannot be the same as the real address of the of the jetNEXUS ALB-X. i.e eth0, eth1 etc…
The jetNEXUS ALB-X determines how the traffic is distributed to the content servers based on a load balancing policy set within the Actions section.
To Create a new Channel
- 1.Click Add IP. The Status light will appear grey in colour and the Enabled box will be ticked.
- 2.Double click in the empty IP Address section. Enter the VIP address for your Channel. Example 192.168.1.100
- 3.Double click in the empty Subnet Mask section. Enter the subnet mask. Example 255.255.255.0
- 4.Double click in the empty Port section. Enter the TCP/UDP port the Channel will listen on.
- 5.Double click in the Service Type section. Choose the service type from the drop down menu.
- 6.Click Update.
Note: You may use the Tab key to move to the next box when configuring. For example, type in the IP Address and press the Tab key to move to the Subnet Mask section and so on.
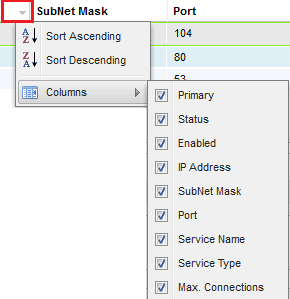
Filtering and Sorting Columns
To the far right of each column is small down arrow (see the red box below). Clicking on this will reveal an extra submenu that allows you to “Sort Ascending”, “Sort Descending” and “Columns”. Add and remove the tick to show/hide the columns listed below.
Example

Primary
This column will remain empty unless the ALB-X is part of a High Availability (H/A) cluster. When in a H/A cluster a tick box will appear. Double click on the tick box to edit, single click to add a tick if you wish the ALB-X to be the primary ALB-X for the channel. Leave this blank if you wish the ALB-X to be a secondary for the channel. To configure high availability see Failover.
Status
 Online
 Failover-Standby. This virtual service is hot-standby
 Indicates a “secondary” is holding off for a “primary”
 Offline. Content servers are unreachable or no content servers enabled
 Finding status
 Not licensed or licensed Virtual IPs exceeded
Enabled
By default the box is ticked to enable the channel. Double click on the box to edit and single click to remove the tick. This will disable the channel.
IP Address
Double click to edit the column. Add in your IPv4 address in decimal dotted notation. This is the Virtual IP address for your service. Example “192.168.1.100”.
Subnet Mask
Double click to edit the column. Add in your subnet mask in decimal dotted notation. Example “255.255.255.0”.
Port
Double click to edit the column. Add in the port number associated with your service. This may be TCP or UDP port number. Example “80” for Web Traffic.
Service Name
Double click to edit the column. Add in a friendly name to identify your service. Example “Production Web Servers”.
Service Type
Layer 4 TCP:
Any TCP port (Layer 4)
Layer 4 UDP:
Any UDP port (Layer 4) This will change the connectivity to Basic and is only available in this mode
Layer TCP/UDP:
Any TCP or UDP port (Layer 4) This will change the connectivity to Basic and is only available in this mode. This is ideal if your service has a primary protocol such as UDP but will fall back to TCP
Accelerate HTTP:
HTTP(s) Protocol (Layer 7) with compression on the client side
HTTP:
HTTP(s) Protocol (Layer 7) without compression
FTP:
FTP Protocol (Layer 7)
SMTP:
Simple Mail Transfer Protocol (Layer 4)
POP3:
Post Office Protocol (Layer 4)
IMAP:
Internet Message Access Protocol (Layer 4)
RDP:
Remote Desktop Protocol (Layer 4)
RPC:
Remote Procedure Call (Layer 4)
RPC/ADS:
Exchange 2010 Static RPC for Address Book Service (Layer 4)
RPC/PF:
Exchange 2010 Static RPC for Public Folders (Layer 4)
DICOM:
Digital Imaging and Communications in Medicine (Layer 4)
This limits the number of simultaneous content server connections and can be set per channel. For example if you set this to 1000 and have two content servers then the jetNEXUS ALB-X will only connect 1000 connections simultaneously to EACH of the two content servers. You may also choose to present a “Server too busy” page, once this limit is reached on all servers, helping users in this case.
Leave this blank for unlimited connections. This will depend on your system resources.
![]()
![]()
Destination
![]()
The destination section contains the real content server details associated with the highlighted channel. You must add at least one content server to a channel. If you wish to weight a server then simply add in the same IP address and port more than once.
Example: – this weights 25% to Web Server 1 and 75% to Web Server 2
| IP Address | Port | Notes |
|---|---|---|
| 10.1.1.1 | 80 | Web Server 1 |
| 10.1.1.2 | 80 | Web Server 2 |
| 10.1.1.3 | 80 | Web Server 2 |
| 10.1.1.4 | 80 | Web Server 2 |
To add a new content server to a channel
- 1.Click Add New.
- 2.A new line will appear with a grey Status light.
- 3.Double click on the empty IP Address section. Enter the real IP address for your Content Server. The Content Server can be on a local network or any network that your jetNEXUS ALB-X can route to. Example “10.1.1.1”.
- 4.Double click on the empty Port section. Enter the TCP/UDP port the Content Server is listening on.
- 5.Double click on the Notes section. Add in some useful information about your content server.
Content Server Details
Content Server Group Name:
- This is name you can associate with a particular group of servers. For Example “Exchange 2010 CAS Array”.
- Click the middle Update button on the right hand side to save the group name.
Content Server Status Lights
- Connected
 Draining
- Offline
- Standby
- Not connected
- Finding status
- Not licensed or licensed real servers exceeded
Activity
By double clicking on the Activity section you can assign one of the four activities below.
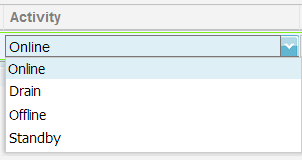
Online:
Any content servers assigned as Online will load balance traffic.
Drain:
Any content servers assigned as Drain will continue to serve existing connections but will not accept any new connections. The Status light will flash Green/Blue whilst draining. Once the existing connections have closed naturally the content servers will be taken offline and the Status light will be solid blue.
Offline:
Any content servers assigned as Offline will immediately be taken offline and will not load balance traffic.
Standby:
Any content servers assigned as Standby will remain offline until ALL of the Online group fail, at which point members of the Standby group will load balance traffic. If one of the Online group becomes available they will start serving content and the Standby group will no longer load balance traffic.
IP Address
Double click to edit the column. Add in your IPv4 address in decimal dotted notation. This is the Real IP address for your content servers. Example “192.168.1.200”.
Port
Double click to edit the column. Add in the port number associated with your service. This is a TCP port number and does not have to match the virtual port. Example “80” for Web Traffic.
Notes
Double click to edit the column. Add in some useful notes about the particular server. Example “IIS Server1 – London DC”.
![]()
Actions
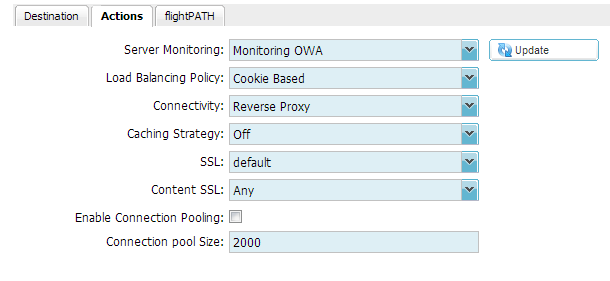
Server Monitoring
Your jetNEXUS ALB-X contains four standard Content-Server Monitoring methods listed below. Choose one to apply to the channel. Please make sure that you apply a relevant monitor to the server. If the content server is an RDP server a 200 OK monitor is not relevant.
None:
In this mode, the content server is not monitored at all and is assumed to be always up and running correctly. This is useful for situations where monitoring upsets a server and for services that should not join in the fail-over action of ALB-X. It can be viewed as a way of hosting unreliable or legacy systems that are not core to H/A operation. This monitoring method can be used with any service type.
Ping/ICMP Echo:
In this mode, ALB-X sends an ICMP echo request to the IP of the content server. If a valid echo response is received, the content server is deemed to be up and running and traffic will be sent to it. It will also then keep the service available on an H/A pair. This monitoring method can be used with any service type.
TCP Connection:
In this mode, a TCP connection is made to the content server and immediately broken without sending any data. If the connection succeeds, the content server is deemed to be up and running. This monitoring method can be used with any TCP service type. UDP services are the only ones currently not appropriate for TCP Connection monitoring.
RDP:
In this mode, a TCP connection is made as above, but after the connection is made a layer 7 RDP connection is requested. If the connection is confirmed the content server is deemed to be up and running. This monitoring method can be used with Microsoft terminal servers. This health check is not compatible with RDP server with NLA enabled. Please use TCP Connect in this particular instance. We hope to include these servers in a later release.
200 OK:
In this mode, a TCP connection is made to the content server as above, but after connection is made, a brief HTTP request is made to the content server. An HTTP response is waited for and it is checked for the “200 OK” response code. If the “200 OK” response code is received, the content server is deemed to be up and running. If, for any reason, the “200 OK” response code is not received, including timeouts, failure to connect, etc, then the content server is regarded as down. This monitoring method can only really be used with HTTP and Accelerate HTTP service types, although if a Layer 4 Service Type is in use for an HTTP server, it could still be used if SSL is not in use on the content server, or is handled appropriately by the “Content SSL” facility.
DICOM:
In this mode, a TCP connection is made to the content server as above, but after a connection is made, an Echoscu “Associate Request” is made to the content server. A conversation that includes an “Associate Accept” from the content server, a transfer of a small amount of data followed by a “Release Request” then “Release Response” succesfully concludes the monitor. If for any reason the monitor does not complete successfully then the content
server is regarded as down.
User Defined:
Any monitor configured in the Content Server Monitoring section will appear in the list..
Load Balancing Policy
Select from the drop down list how you would like the traffic to be load balanced.
Round Robin:
The simplest method, each back end server takes a turn.
Least Connections:
The load balancer will keep track of the number of connections a back end server has and send the next request to the server with the least connections.
IP Bound:
In this situation the clients IP address is used to select which back end server will receive the request. This provides persistence. It can be used with HTTP or layer 4 protocols. This method is useful for internal networks where the network topology is known and you can be confident that there are no “super proxies” upstream. With layer 4 and proxies, all the requests can look as if they are coming from one client, and as such the load would not be even. With HTTP, X-Forwarded-For information is used, if present, to cope with proxies.
IP List Based:
The initial connection to the content server is made using “Least connections” then session affinity is achieved based on Clients IP. A list is maintained for 2 hours.
Cookie Based:
This is the most popular persistence method for HTTP. In this situation, IP list based load balancing is used for each first request. A cookie is inserted into the headers of the first http response. Thereafter, jetNEXUS ALB-X uses the client cookie to route traffic to the same back end server. Again this is used for persistence, when the client must go to the same back end server each time.
Session Cookie:
Classic ASP Session Cookie:
Active Server Pages (ASP) is a Microsoft server-side technology. With this option selected the ALB-X will maintain session persistence to the same server if an ASP cookie is detected and is found in its list of known cookies. If a new ASP cookie is detected then it will be load balanced using the least connections algorithm.
ASP.NET Session Cookie:
ASP.NET is a Microsoft server-side technology. With this option selected the ALB-X will maintain session persistence to the same server if an ASP.NET cookie is detected and is found in its list of known cookies. If a new ASP.NET cookie is detected then it will be load balanced using the least connections algorithm.
JSP Session Cookie:
Java Server Pages (JSP) is an Oracle server-side technology. With this option selected the ALB-X will maintain session persistence to the same server if a JSP cookie is detected and is found in its list of known cookies. If a new JSP cookie is detected then it will be load balanced using the least connections algorithm.
JAX-WS Session Cookie:
Java web services (JAX-WS) is an Oracle server-side technology. With this option selected the ALB-X will maintain session persistence to the same server if a JAX-WS cookie is detected and is found in its list of known cookies. If a new JAX-WS cookie is detected then it will be load balanced using the least connections algorithm.
PHP Session Cookie:
Personal Home Page (PHP) is an open source server-side technology. With this option selected the ALB-X will maintain session persistence to the same server if a PHP cookie is detected.
Connectivity
Your channel can be configured with four different types of connectivity. Please select one to apply to the channel.
Reverse Proxy:
This is the default setting for jetNEXUS ALB-X and works at Layer7 with compression and caching and also at layer4 without caching and compression. In this mode your jetNEXUS ALB-X acts as a reverse proxy and becomes the source address seen on the content servers.
Direct Server Return:
Direct Server Return or DSR as it’s widely known (DR – Direct Routing in some circles) allows the server behind the load balancer to respond directly to the client bypassing the edgeNEXUS on the response. DSR is suitable for using with Layer 4 load balancing only therefore Caching and Compression are not available when enabled.
Layer 7 load balancing with this method will not work therefore there is no persistence support other than IP List Based. SSL/TLS load balancing with this method is not ideal as there is only source IP persistence support. This method requires content server changes. Please refer to the content server changes section.
Transparency:
Transparency is suitable for Service Type Layer 4 load balancing only. Caching and Compression are not available when transparency is enabled. Transparency is used when you need the source address of the client making the request and X-Forwarded-For techniques are not sufficient. Layer 7 load balancing with this method will not work therefore there is no persistence support other than IP List Based. This method requires content server changes. Please refer to the content server changes section.
Gateway:
Gateway mode allows you to route all traffic through the jetNEXUS, this allows traffic from the content servers to be routed via the edgeNEXUS to other networks via the interfaces on the edgeNEXUS unit. Using the device as a gateway device for content servers should be used when running in multi interface mode. Layer 7 load balancing with this method will not work therefore there is no persistence support other than IP List Based. This method requires that the content server sets its default gateway to the local interface address (eth0, eth1, etc….) of the jetNEXUS ALB-X. Please refer to the content server changes section.
Basic:
Basic mode is a very low latency low CPU mode that will provide simple load balancing. The load balancing policy is restricted to Round Robin or if you require session persistence IP List Based. This mode is only available with the 64bit platform which is available from here.
Caching Strategy
By default the caching strategy is set to Off. If your channel service type is HTTP then you can apply two types of caching strategy. Please refer to the Configure Cache page to configure detailed cache settings. Note that when caching is applied to a channel with service type “Accelerate HTTP”, objects that are compressed will not be cached.
By Host:
Caching is applied on a per hostname basis. A separate Cache will exist for each domain/hostname. Ideal for web servers that can serve multiple websites depending on the domain.
By Channel:
Caching is applied to the whole channel. Only one Cache will exist. This is a specialist setting for use with multiple clones of a single site.
Client SSL Certificate (Encryption between Client and ALB-X)
By default this is set to No SSL. If your service type is “Accelerate HTTP”/”HTTP” you can select a certificate from the drop down box to apply to the channel. Certificates that have been created or imported will appear in this list.
No SSL:
Traffic from the browser to the ALB-X will not be encrypted.
Default:
A locally created certificate called “Default” is applied to the browser side of the channel. This can be used to test SSL when one hasn’t been created or imported.
UserCertificate1:
A locally created, imported or signed certificate is applied to the browser side of the channel.
Content SSL Certificate (Encrption between ALB-X and Content Server)
By default this is set to No SSL. If your server requires an encrypted connection then this must be set to anything other than No SSL. Certificates that have been created or imported will appear in this list.
No SSL:
Traffic from the ALB-X to the content server will not be encrypted.
If a certificate has been selected – on the browser side, “No SSL” can be selected client-side to provide what is known as “SSL Offload”.
UserCertificate1:
Traffic from the ALB-X to the content server will be encrypted provided the named certificate is presented by the content server.
If a certificate has been selected – on the browser side, “UserCertificate1” can be selected to provide what is known as “SSL Bridging” or “SSL Re-Encryption”.
Any:
The ALB-X acts as a client and will accept any certificate the content server presents. Traffic from the ALB-X to the content server will be encrypted if this is selected.
If a certificate has been selected – on the browser side, “Any” can be selected to provide what is known as “SSL Bridging” or “SSL Re-Encryption”.
Enable Connection Pooling
When this is ticked the ALB-X maintains connections to the content server so they can be reused when future requests to the content servers are requested. This setting is only valid for Service Type “HTTP” and should be used for stateless web connections only.
Connection Pool Size
Set the number of connections to maintain.
![]()
flightPATH
- flightPATH rules are designed to manipulate HTTP(s) traffic. As such, the option for flightPATH is not visible for non HTTP protocols.
- The list of available rules is on the right and the current rules applied to the channel are on the left.
- To add a new rule drag and drop the rule into position.
- The order for execution is important and will start with the top rule being executed fist. To change the order highlight a rule and use the arrows to move up or down the list.
- To remove a rule simply drag and drop it back to the rule inventory.
- You can add, remove and edit flightPATH rules in the Configure flightPATH section.
- Please note that any flightPATH rule with an Action that includes ‘Body Replace’ will effectively turn off compression for the channel to which it is applied.
![]()