Appliance
The Setup–>Appliance section allows you view and update the network details of your jetNEXUS ALB-X load balancer. It is organised into the following sections.
Adapter Details
Here you can add, remove and update the adapter settings.
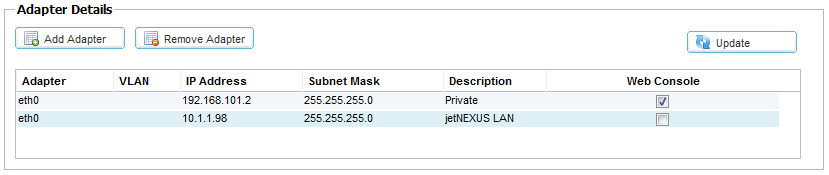
Adapter:
Double click to see the physical adapters installed on your appliance. Choose an adapter from the list
VLAN:
Double click to add the VLAN ID for the adapter. A VLAN is a Virtual Local Area Network which creates a distinct broadcast domain. A VLAN has the same attributes as physical LAN but it allows for end stations to be grouped together more easily if they are not on the same network switch
IP Address:
Double click to add the IP address associated with the adapter interface. You can add multiple IP addresses to the same interface. This should be an IPv4 32-bit number in quad dotted decimal notation. Example: 192.168.101.2
Subnet Mask:
Double click to add the subnet mask assigned to the adapter interface. This should be an IPv4 32-bit number in quad dotted decimal notation. Example: 255.255.255.0
Description:
Double click to add a description for your adapter. Example: Public Interface. Note: The ALB-X will automatically name the first interface Green Side, the second interface Red Side and the third interface Side 3 etc.. Please feel free to change these naming conventions to your own choice
Web Console:
Double click the column then tick the box to assign the interface as the management address for the Graphical User Interface Web Console. Please be very careful when chaninging the interface that Web Console will listen on. You will need to have the correct routing set up or be in the same subnet as the new interface in order to reach the Web Console after the change. The only way to change this back is to access the command line and issue the set greenside command. This will delete all interfaces except for eth0
![]()
Appliance

Server Ref:
Add in a name for your jetNEXUS ALB-X appliance
DNS Server:
Add in the IPv4 address of you DNS server
Tick the box to enable this ALB-X to operate in high availability mode. A tick box will appear in Primary column in the Channel Details section of the IP Services Tab
The default Failover timer is set to 10000ms
- This is the delay the ALB-X will wait upon bringing up a channel when a failure occurs
- The minimum should be set to no less than 2000ms to prevent services “flip-flopping” back and to
Notes on High Availability
- There is no requirement for a dedicated cable to maintain high availability heartbeat
- The heartbeat takes place on the same network as the virtual service that requires high availability
- There is no stateful connection between appliances
- When failover is enabled on two or more appliances each box will broadcast via UDP the Virtual Services it is configured to provide
- To make a Virtual IP address “Active” tick the check-box in the primary column (IP Services page)
- To make a Virtual IP address “Passive” leave the check-box blank in the primary column (IP Services page)
- In the even that a Primary service fails over to the secondary
- If both are ticked primary then an election process takes place and the lowest MAC address will be “Active”
- If both are un-ticked then the same election process takes place. In addition if both are un-ticked there is no automatic failback
Active – Passive:
- Tick Failover Enabled on two or more ALB-X appliances
- Set Failover timer on each appliance
- Configure the same Virtual IP Service on both appliances
- Tick “Primary” check box in the IP-Services page on the “Active” appliance
- Leave “Primary” check box un-ticked in the IP Services page on the “Passive” appliance
- The Status light on the Active VIP will be shown as Green and “Online”
- The Status light on the Passive VIP will be shown as Blue and ” Standby”
Active – Active: You can only configure the appliance in Active-Active mode for unique Virtual IP addresses
- Tick Failover Enabled on two or more ALB-X appliances
- Set Failover timer on each appliance
- Configure 2 or more Virtual IP address services on both appliances
- On Appliance 1 in the Primary column, tick the check-box for Service A
- On Appliance 2 in the Primary column, un-tick the check-box for Service A
- On Appliance 2 in in the Primary column, tick the check-box for Service B
- On appliance 1 in the Primary column, un-tick the check-box for Service B
- On Appliance 1 the status light for Service A should be Green (online) and the Service B should be Blue (standby)
- On Appliance 2 the status light for Service A should be Blue (standby) and Service B should be Green (online)
Server Nagle:
Tick the box to enable. This is a means to improve efficiency of TCP/IP networks by reducing the number of packets that need to be sent over the network
Client Nagle:
Tick the box to enable
![]()