Edgenexus ALB-X – Oracle E-Business Suite 12 – Deployment Guide
Pre-requisites
Overview
Why Edgenexus?
What is a jetPACK?
Oracle E-Business Suite Description
Example Diagram
HTTP Deployment
SSL Offload
Telnet Deployment
Troubleshooting
Contact Us
Pre-requisites
The following are general
prerequisites and configuration notes for this guide:
-
- It is assumed that
the reader is a network administrator or person familiar with networking and general computer terminology
- It is assumed that
-
- You must have an
existing Oracle E-Business suite deployment
- You must have an
-
- This deployment guide contains
configuration procedures to configure Edgenexus ALB-X appliances only
- This deployment guide contains
- We
recommend reading Oracle Support white paper: “Using Load-Balancers
with Oracle E-Business Suite Release 12”. Doc ID is Note:380489.1 - Minimum Software Version 3.53.2 (Build 1510) or
later on your Edgenexus ALB-X
Overview
The ALB-X is an Application Delivery Controller (ADC)
sometimes referred to as a next generation load balancer. The ALB-X
provides intelligent traffic management, scalability and fail-over
for Oracle EBS servers.
This document assumes a degree of
familiarity with the ALB-X GUI. For more general information on the
ALB-X and the GUI, please refer to the User Guide
This document assumes that you
are already familiar
with the process of installing Oracle E-Business Suite.
Why Edgenexus?
| Layer 4 & Layer 7 Load Balancing | Application layer server health checks are able to detect and route around problems to eliminate downtime |
|
| Session Persistence | Cookie based or IP based session persistence. Session timers can be adjusted |
|
| Reverse Proxy | Edgenexus ALB-X can provide Reverse-Proxy architecture, enabling secure remote client connections to internal resources |
|
| Compression | Content Compression features improve remote client performance |
|
| SSL Offload | Enables end-to-end secure encrypted traffic between client and load balancer, freeing the content servers from resource hungry process of encyption |
|
| flightPATH | Edgenexus ALB-X is able to intelligently redirect clients to the correct resources |
|
| jetPACK | Quick and easy deployment using jetPACK application templates |
What is a jetPACK?
A jetPACK is a simple text file that you can upload to your appliance
that contains all of the configuration needed to deploy an application
such as Oracle E-Business Suite.
| The Edgenexus ALB-X can be configured automatically with an Oracle EBS “jetPACK” template, which is fully-tuned with all of the application-specific settings that you need in order to enjoy optimised service delivery from your ALB-X |
||
| If you supply the virtual IP address and real server IP addresses to support@edgenexus.io we will send you a custom jetPACK that you simply upload to your Edgenexus ALB-X |
||
| The upload can be done via the GUI and will result in a fully configured ALB-X within less than 1 minute |
||
| The relevant jetPACK can be applied to multiple Edgenexus ALB-X appliances saving valuable time and eliminating simple mistakes |
||
| For more information please go to our website http://www.edgenexus.io/usercentral/3-55-1/jetpack.html#Oracle_E-Business_Suite |
Oracle E-Business Suite 12 Description
Oracle E-Business Suite is the most comprehensive suite of
integrated, global business applications that enable organisations to
make better decisions, reduce costs and increase performance.
For more information
http://www.oracle.com/us/products/applications/overview/index.html
Example Oracle E-Business Diagram
Diagram 1.1
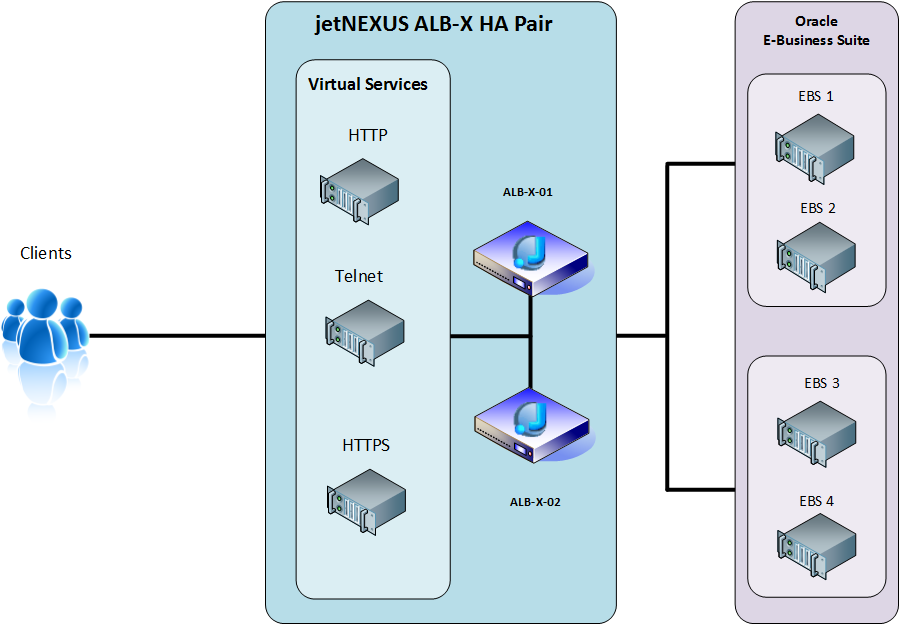
Port Requirements
Service Name |
Service Type |
TCP Port |
Description |
| Web Front End | HTTP | 80 | Used to provide HTTP access to Oracle EBS app servers |
| Secure Web Front End | HTTP | 443 | Used to provide SSL secure access to Oracle EBS app servers. |
| Telnet | Layer 4 TCP | 10300 | Used to provide telnet access to the Oracle EBS app servers |
HTTP Deployment
Please complete the following procedures:
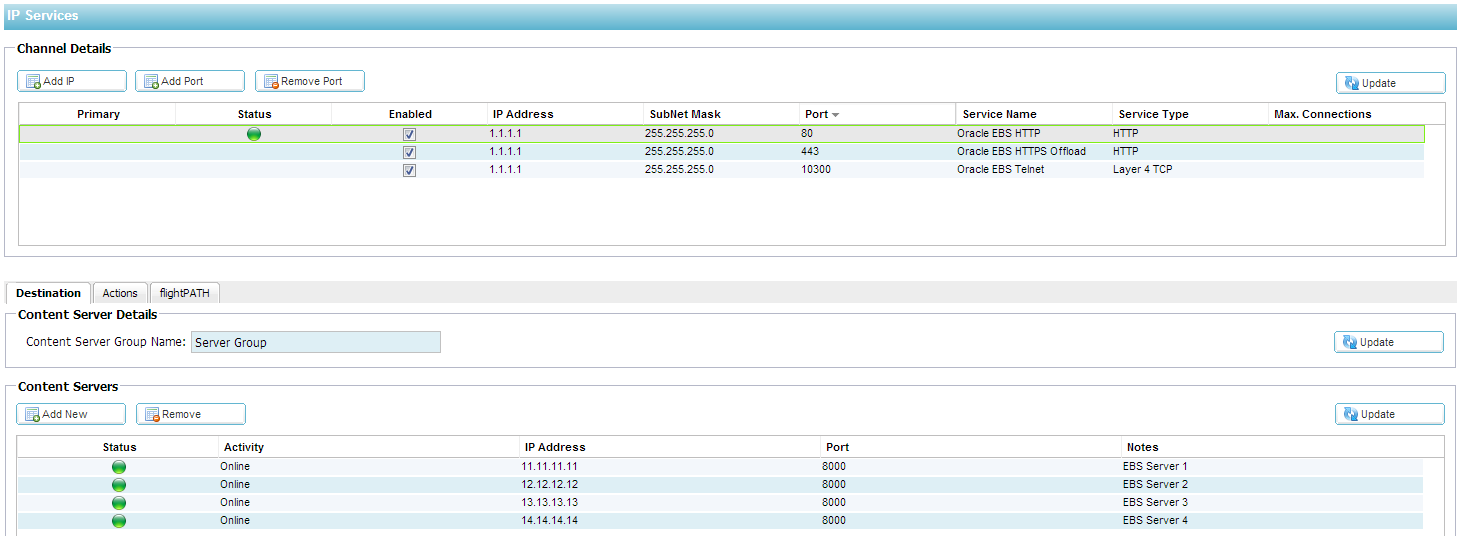
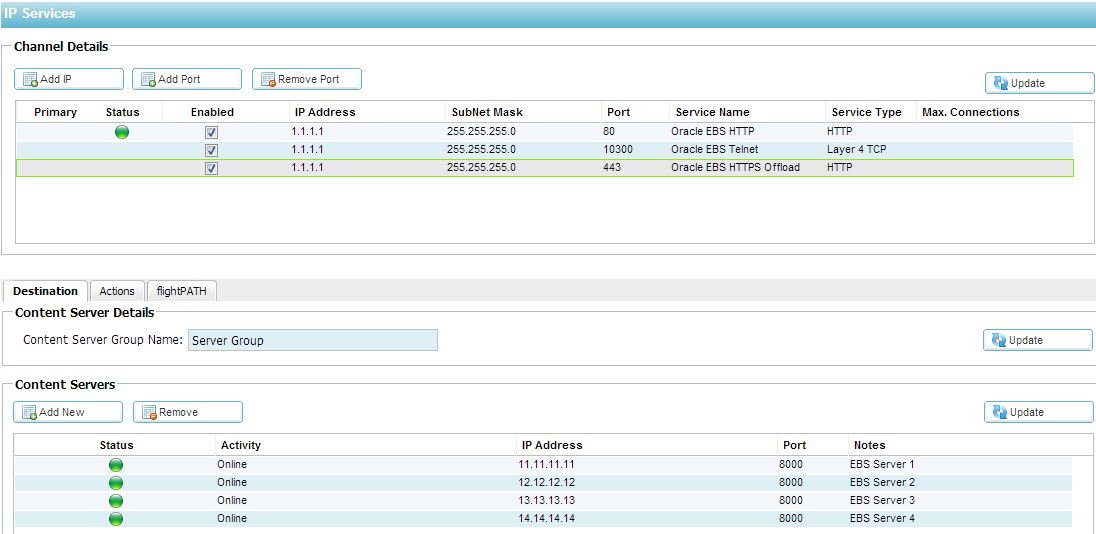
1. Create a Virtual Service for HTTP
- Navigate to the IP Services page
- Click Add IP to add a blank row in top Channel Details section
- Complete the column details as per the screen shot below
- Note the Primary column will be blank unless you have enabled
failover. Please see section on failover / high availability in the
online user guide here - Start by double clicking on IP Address column of your blank row
- Once complete you can TAB to the next column to edit
2. Add Real Servers to the Virtual Service
- With the Destination Tab highlighted click Add New in the bottom Content Servers section.
- A blank row will appear. Double Click on this row below each column starting with the IP Address column to add your servers
- To save the server details click the Update button on the right hand side of this section.
- You can add additional servers with the Add New button
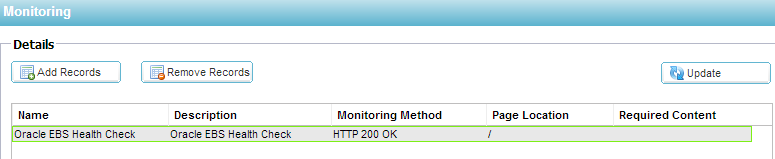
3. Create a Server Health Monitor
Navigate to Configure–Content
Server Monitoring
- Add a new health check by clicking Add Records
- In the name section double click to edit and then
type Oracle EBS Health
Check - In the Description
section add a suitable description
of the health check - Choose HTTP
200 OK as a Monitoring
Method - Set the Page
Location to / - Leave the required content blank
- A new monitor will now be added to the
list and can be selected from the Actions
section of the IP
Services page
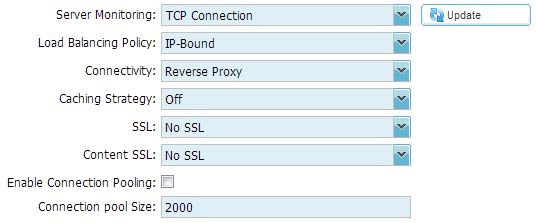
4. Set the Actions for the channel
Apply the following actions:
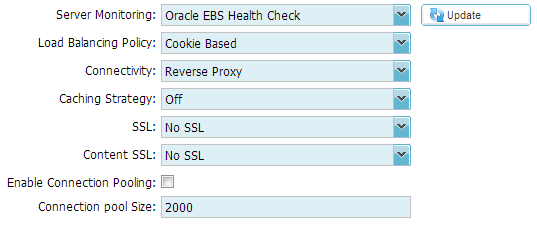
Note: Cookie
based load balancing tells the client to set a cookie which is associated with a particular Oracle server to maintain session
persistence (sticky sessions).
The default settings for this cookie
will need to be altered for Oracle E-Business Suite to remove the HTTP
Only flag and set a timeout of 12 hours. Please see the jetPACK section
for these updates.
HTTPS Deployment
Before you can use the ALB-X as an SSL proxy you must create or import an SSL certificate.
To create or import an SSL certificate please refer to the
Configure–SSL Certificates section of the online userguide. You can open
up a new tab to this resource here
1. Create a Virtual Service for HTTP
- Navigate to the IP Services page
- Click Add Port to add a partially configured row in top Channel Details section. The IP address and Subnet Mask will be completed for you
- Complete the column details as per the screen shot below
- Start by double clicking on Port column of your partially completed row
- Once complete you can TAB to the next column to edit
2. Add Real Servers to the Virtual Service
- With the Destination Tab highlighted click Add New in the bottom Content Servers section.
- A blank row will appear. Double Click on this row below each column starting with the IP Address column to add your servers
- To save the server details click the Update button on the right hand side of this section.
- You can add additional servers with the Add New button
3. Set the Actions for the channel
The Actions settings for
HTTPS/SSL offload are similar to the HTTP channel. The only difference
is to apply an SSL certificate to the client side connection (SSL).
Ensure that the Content SSL is set to “No SSL”.
Below we have already created a certificate called OracleEBScertificate so we simply need to choose it from the drop down box

Telnet Deployment
Please complete the following procedures:
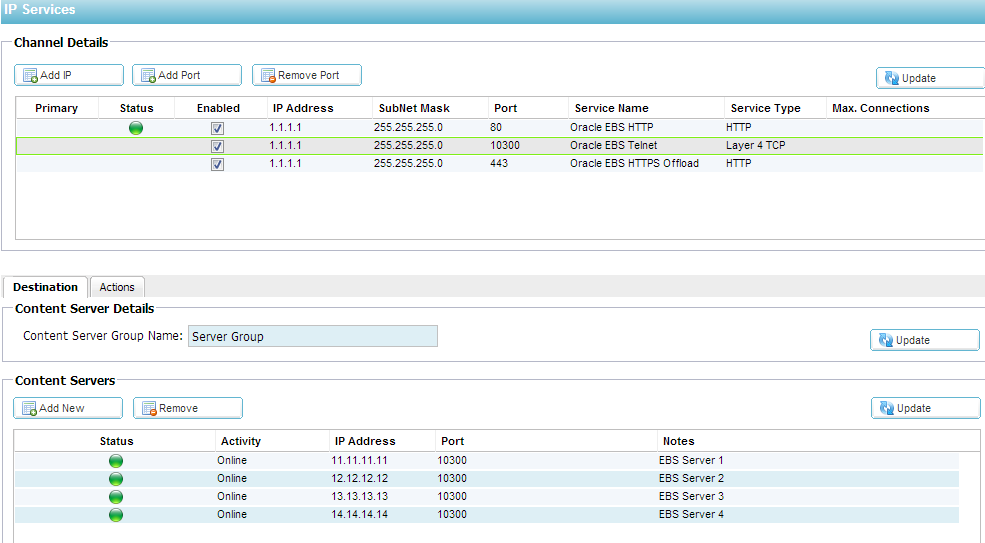
1. Create a Virtual Service for Telnet
- Navigate to the IP Services page
- Click Add Port to add a partially configured row in top Channel Details section. The IP address and Subnet Mask will be completed for you
- Complete the column details as per the screen shot below
- Start by double clicking on Port column of your partially completed row
- Once complete you can TAB to the next column to edit
2. Add Real Servers to the Virtual Service
- With the Destination Tab highlighted click Add New in the bottom Content Servers section.
- A blank row will appear. Double Click on this row below each column starting with the IP Address column to add your servers
- To save the server details click the Update button on the right hand side of this section.
- You can add additional servers with the Add New button
3. Set the Actions for the channel
Troubleshooting
Further help can be found on the edgeNEXUS websites
http://www.edgenexus.io/support
Usercentral
Contact Us
We hope you have found this Deployment Guide informative, but if you
need any clarification or further information, please do not hesitate
to get in contact with Edgenexus Support:
|
|
support@jetNEXUS.com |
Phone |
+44 (0870) 382 5529 |
Blog |
http://jetNEXUS.blogspot.com/ |
 Back to Top