ADFS Deployment Guide
- Overview
- Assumptions
- Pre-requisites
- Requirements
- Why Edgenexus?
- What is a jetPACK?
- ADFS jetPACK
- Passthrough Configuration – All Sever Types
- Re-Encryption Configuration
- Troubleshooting
- Contact Us
Overview
Welcome to this Edgenexus deployment guide, which provides you with everything you need to successfully configure ALB to provide load balancing and redundancy for Active Directory Federation Services (AD FS) servers and server proxies.
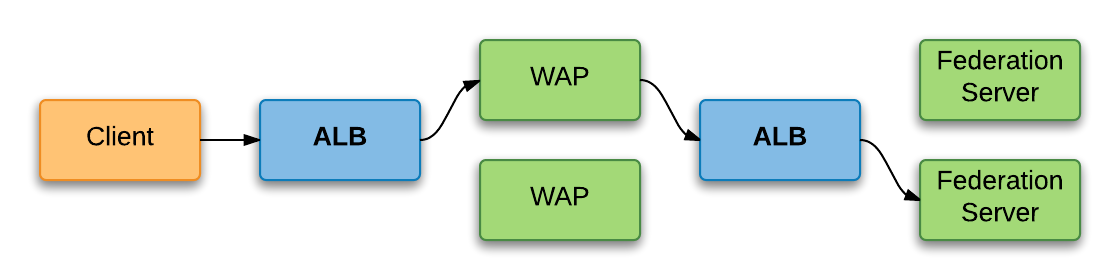
The configuration required for Federation Servers, Federation Proxy Servers and Web Application Proxy servers is almost identical, the exception being the Server Monitor assigned if an advanced monitor is used. Each group of any server type will of course require a dedicated Virtual Service (and IP) to provide load balancing across it. For example, if you use Federation Servers and Web Application Proxy servers, you will need two Virtual Services, as shown in the following diagram. A single load balancer can provide both Virtual Services, we’ve simply shown two for clarity.
Clients use secure SSL/TLS for all communications with AD FS servers and services. You can choose to decrypt and re-encrypt that traffic and apply advanced features or simply pass it through as is. Even doing that you can still benefit from various automatic TCP optimisations.
Before we get into the real detail, let’s quickly detail the assumptions made by this guide and the prerequisites and requirements for a successful deployment.
Assumptions
- ALB Already installed, licensed and configured as necessary so it is reachable by clients and can reach the real servers.
- TLS certificates are installed if decrypting and re-encrypting the traffic. Go here for instructions on importing certificates.
Pre-requisites
- AD FS v2.0 or v3.0.
Requirements
- An IP address per Virtual Service required.
- DNS Records that reflect the IP addresses assigned to each Virtual Service.
- TLS certificates if decrypting and re-encrypting the traffic.
Now let’s cover the full detail of the configuration, starting with what’s required when you’re not decrypting and re-encrypting SSL.
Why Edgenexus?
| Layer 4 & Layer 7 Load Balancing |
Application layer server health checks are able to detect and route around problems to eliminate downtime |
| Reverse Proxy | Edgenexus ALB-X can provide Reverse-Proxy authentication and secure remote access to all Exchange HTTP-based client access services |
| Compression | Content Compression features improve client performance |
| SSL Re-Encryption | Enables end-to-end secure encrypted traffic between client and internal resources whilst still being able to provide acceleration and traffic manipulation with flightPATH |
| flightPATH | jetNEXUS ALB-X is able to intelligently redirect clients to the correct resources |
| jetPACK | Quick and easy deployment using jetPACK application templates |
What is a jetPACK?
A jetPACK is a simple text file that you can upload to your appliance
that contains all of the configuration needed to deploy an application
such as Exchange 2013.
For more information on jetPACK see below.
jetPACK
Passthrough Configuration – All Server Types
Without the SSL functions, this is seriously simple. Log in to your device and in the Navigation pane on the left, click Services > IP Services, then;
- Click the** Add Virtual Service** button near the top right
- Enter the IP Address, a Subnet Mask/Prefix, the listening Port of 443, a Service Name and a Service Type of Layer 4 TCP
- Click Update when you’re done and then select your new Virtual Service

Moving down to the Real Servers section;
- Click the Add Server button on the right
- Enter an IP Address and a Port value of 443
- Optionally, enter a Weight and some Notes
- Repeat as necessary for the other servers you have

Now all that’s left is to configure load balancing itself;
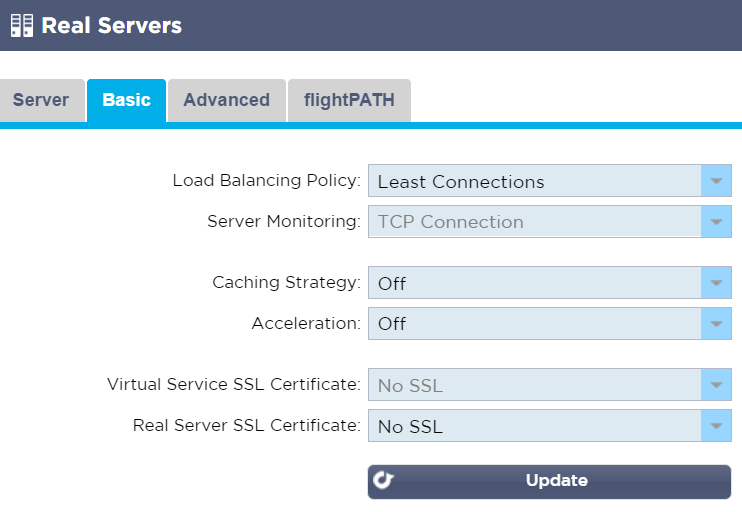
- Click the Basic tab
- Select the Load Balancing Policy you’d like to use; Least Connections is a good (and the default) choice
- Ensure Caching Strategy and Acceleration are Off
- Ensure both SSL Certificate options are set to No SSL
- Click Update
If you’d like to configure Logging, monitor timers or other advanced settings;
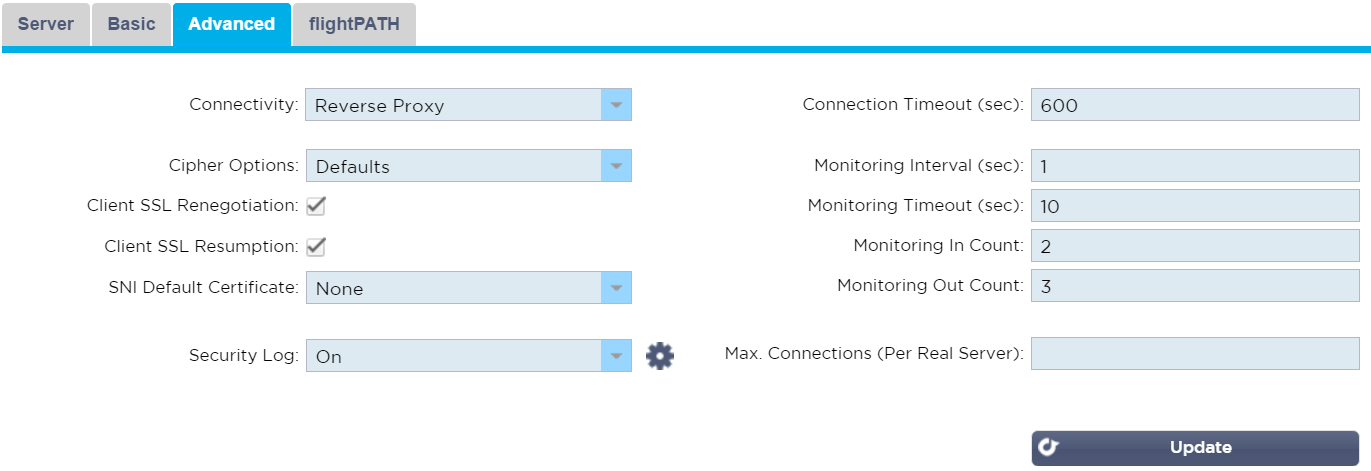
- Click the Advanced tab
- Modify any settings you wish to, noting the four SSL related setting have no affect
- Click Update
If you are using a cluster, all configuration is automatically copied to other cluster members and you can perform these steps on any member.
If you have other server types, repeat these steps as necessary.
Unless you follow the steps in the next section, real server monitoring is a TCP port check.
Passthrough Configuration – Advanced Server Monitoring
If you’d like to make use of more advanced, application-level real server monitoring, we’ve got you covered. This requires a minimum software version of v4.2.1 and a couple of quick software installations.
Log in to your device and in the Navigation pane on the left, click Advanced > Software, then;
Next, you should install the HTTPS SNI real server monitor; (if its not already installed)
- Click Services > App Store
- Login if necessary. If you don’t have an account, you’ll need to create one.
- Search for SNI
- Select the HTTPS_SNI app and click Add to Cart
- Click Proceed to Checkout
- Fill in your billing details and click Place Order
- Enter your Machine ID and click the blue Download button
- Navigate to Advanced > Software
– In the Upload Software To ALB area click Browse
Use the Real Server monitoring section to configure the page location, the required content and the notes section to configure the sni domain
SSL Re-encryption Configuration – All Server Types
This configuration is slightly more involved but has the benefit of allowing for the use of many additional features such as compression. Log in to your device and in the Navigation pane on the left, click Services > IP Services, then;
- Click the ** Add Virtual Service** button near the top right
- Enter the IP Address, a Subnet Mask/Prefix, the listening Port of 443, a Service Name and a Service Type of HTTP
- Click Update when you’re done and then select your new Virtual Service

Moving down to the Real Servers section;
- Click the Add Server button on the right
- Enter an IP Address and a Port value of 443
- Optionally, enter a Weight and some Notes
- Repeat as necessary for the other servers you have
Now you should configure load balancing itself, acceleration and the SSL certificates that will be used (go here for instructions on importing certificates);
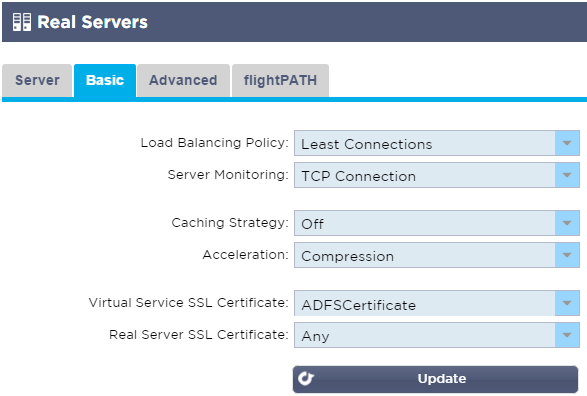
- Click the Basic tab
- Select the Load Balancing Policy you’d like to use; Least Connections is a good (and the default) choice
- Ensure Caching Strategy is Off and the Acceleration value is set to Compression
- Select an appropriate Virtual Server SSL Certificate (which will be presented to the connecting clients)
- Select a Real Server SSL Certificate of SNI or Any
- Click Update
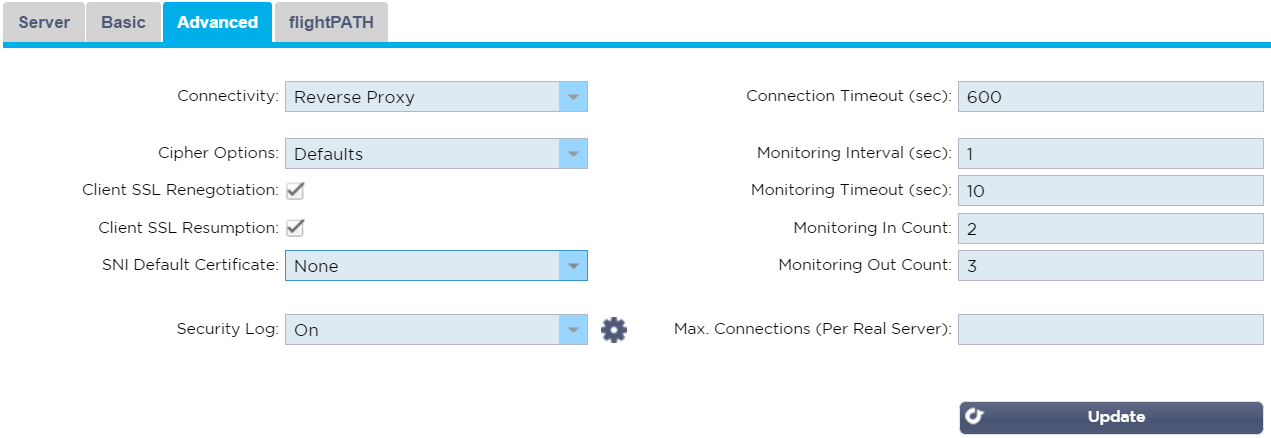
If you’d like to configure Logging, monitor timers and other advanced settings;
- Click the Advanced tab
- Disable Client SSL Renegotiation and/or Client SSL Resumption if required
- If you’re using SNI, select an appropriate SNI Default Certificate
- Modify any other settings you wish to
- Click Update
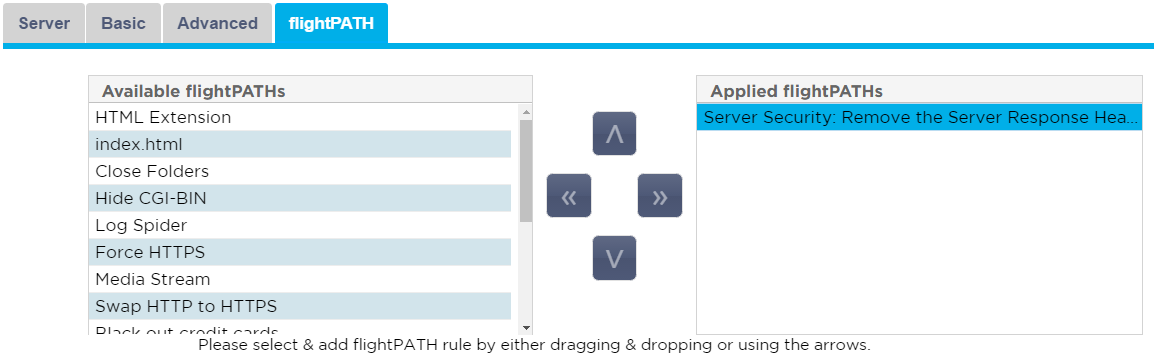
Should you want to make use of the power of flightPATH to intelligently manipulate and route your load balanced traffic;
- Click the flightPATH tab
- Select and order your flightPATH rules as desired
If you are using a clustered pair, remember to copy the configuration to the other cluster member and also ensure the TLS certificates are present on it.
If you have other server types, repeat these steps as necessary.
If you’d like to use more advanced Server Monitors, see the next section.
SSL Re-encryption Configuration – Advanced Server Monitoring
If you are performing decryption and re-encryption you have the option of using more sophisticated server monitors which check the login page is being served. First you’ll need to create the monitor(s) themselves, then assign them to your Virtual Service(s).
To create the monitors log in to your device and In the Navigation pane on the left, click Library > Real Server Monitors, then;
- Click the Add Monitor button near the top left
- Enter a suitable Name and Description
- Select a Monitoring Method value of HTTPS custom
- Enter the Page Location relevant to the version of AD FS being used
- For AD FS 2.0:
/adfs/ls/idpinitiatedsignon.aspx - For AD FS 3.0:
https://domainname.com/ls/idpinitiatedsignon.htm– you’ll notice that the protocolhttps://and the domain name (aka FQDN) are required with this one
- For AD FS 2.0:
- Enter a Required Content of Sign in (the response is searched for this text and the check considered successful if it is found)
- Click Update
Once you’ve created the monitors you need you simply need to assign them to your real servers. In the Navigation pane on the left, click Services > IP Services, then;
- Select the Virtual Service you’d like to use the monitor with
- In the Real Servers section further down the screen click on the Basic tab
- Select the monitor you’ve created from the Server Monitor drop down list
- Click Update
Next Steps
Once your all done with the ALB configuration you can move ahead and;
- Perform suitable testing
- Update relevant DNS records to point to the Virtual Service IP address(es), if you haven’t already
Troubleshooting
Further help can be found on the Edgenexus websites
http://www.edgenexus.io/support/
User-guides
Contact Us
We hope you have found this Deployment Guide informative, but if you
need any clarification or further information, please do not hesitate
to get in contact with edgeNEXUS Support:
 Back to Top