Global Server Load Balancing Add On
-
Introduction
-
Buying a Global Server Load Balancing Add-On
-
Domain Name System Overview
-
GSLB Overview
-
edgeNEXUS GSLB Configuration
Introduction
Global Server Load Balancing (GSLB) is a term used to describe methods for the distribution of network traffic around the Internet. GSLB is different to Server Load Balancing (SLB) as it’s typically used to distribute traffic between multiple data centers, where as a traditional SLB is normally used to distribute traffic within a single data center.
GSLB is typically used in the following situations:
Resiliency and disaster recovery
You have multiple data centers and you wish to run them in an Active-Passive situation so that if one data center fails, traffic will be sent to the other.
Load balancing and geo-location
You would like to distribute traffic between data centers in an Active-Active situation based on specific criteria such as: data center performance, data center capability, data center health check, physical location of the client (so you can send them to their closest data center), etc.
Commercial considerations
Ensure users from certain geographic locations are sent to certain data centers. Ensure different content is served (or blocked) to different users, depending on a number of criteria such as the country that the client is in, the resource they are requesting, the language, etc.
Buying a Global Server Load Balancing Add-On
- You can access the App Store direct at https://appstore.edgenexus.io or open the Services → App Store page from within your ALB-X.
- Click on the Applications icon.
- Click on the edgeNEXUS Global Server Load Balancing icon.
- You will see more information about Global Server Load Balancing.
- You can then choose how many GSLB instances you would like to download. If you are accessing the App Store from within your ALB-X please choose only one.
- If you are accessing direct from the website you may choose multiple, you can assign the correct MachineID to the App later in the process.
- Click Add to Cart.
- Proceed to Checkout.
- Here you will be asked to login if you are a returning customer.
- Alternatively, you can fill out your billing details and tick the box to create an account. You will not be charged for products that are free.
- Click Place Order.
- You should now be presented with a screen that allows you to download your product manually by entering the MachineID and clicking Download.
- If the download is blanked out then you have already tried to purchase to another ALB-X.
- If you have purchased from within an ALB-X via the Services → App Store page then you can now see your purchased Apps in the Library → Apps page.
- Once you have purchased your Global Server Load Balancing App, the first step is to find it in the Library → Apps page and click the green Download button.
- Once your Global Server Load Balancer has been downloaded you will be able to click the Deploy button (it will be greyed out if the GSLB has not been downloaded).
- Once you click Deploy your GSLB will be deployed in the Library → Add-Ons page.
Domain Name System Overview
GSLB can be complex, as such, it is worth spending the time to get a good understanding of how the mysterious Domain Name Server (DNS) system actually works.
DNS consists of three key components:
- The DNS resolver, i.e. the Client: the resolver is responsible for the initiation of the queries that ultimately lead to a full resolution of the resource required.
- Nameserver: this is the nameserver that the client initially connects to, in order to perform DNS resolution.
- Authoritative Name servers including the Top Level Domain (TLD) nameservers and root nameservers.
A typical DNS transaction is explained below:
- The Client resolver initiates a message to the Client’s resolving nameserver.
- The nameserver tries to answer the request, but if it can’t it will send a query to the root nameserver, which handles resolution for all domains on the internet.
- The root nameserver will try and answer the query. If it cannot, it will try and request it from a server that it thinks may have the answer. This is typically the TLD nameservers for the subdomain. I.e. “.com”. The root nameserver then replies with a delegation to the correct TLD nameserver.
- The resolving nameserver then generates a new request to the TLD nameserver.
- The TLD nameserver tries to answer the questions, but if it can’t it will respond with a nameserver that is the authoritative nameserver for the domain i.e. “jetnexus.com” name.
- The resolving nameserver again generates a request to the new nameserver.
- The new nameserver will respond with the appropriate records to send back for “www.jetnexus.com“.
- The resolving nameserver will then return the location to the resolver (Client) that can send it to the application so that the application may initialize a connection.
This process can be further complicated:
Caching
Resolving nameservers cache responses can send the same response to many clients. Client side resolvers and applications may have different caching policies.
Note: For testing, we stop and disable the Windows DNS Client within the services section of your operating system. The DNS names will continue to be resolved, however, it will not cache the results or register the computer’s name. Your system administrator will need to decide if this is the best option for your environment, as it may affect other services.
Time To Live
Resolving name server may ignore the Time To Live (TTL) i.e. the caching time for the response.
GSLB Overview
GSLB is based on DNS and uses a very similar mechanism as described above.
The Edgenexus ALB-X can change the response based on a number of factors described later in the use guide. The Edgenexus ALB-X makes use of the monitors checking for availability of remote resources by accessing the resource itself. However, in order to apply any logic, the system must first receive the DNS request.
There are several designs that allow this. The first is where the GSLB acts as the authoritative nameserver.
The second design is the most common implementation and is similar to the authoritative nameserver configuration, but uses a sub-domain. The main authoritative DNS server is not replaced by edgeNEXUS GSLB, but simply delegates a sub-domain for resolution. Either directly delegating names or using cnames allows you to control what is and what is not handled by the GSLB. This means you don’t have to route all the DNS traffic to the GSLB for systems that don’t require GSLB.
Redundancy is provided so that if one nameserver (edgeNEXUS GSLB) fails, then the remote nameserver automatically issues another request to another edgeNEXUS GSLB, preventing the website from going down.
edgeNEXUS GSLB Configuration
After downloading the Edgenexus GSLB Add-On please deploy it by visiting Library → Apps page of Edgenexus ALB-X GUI and clicking the “Deploy” button as shown in Figure 1.
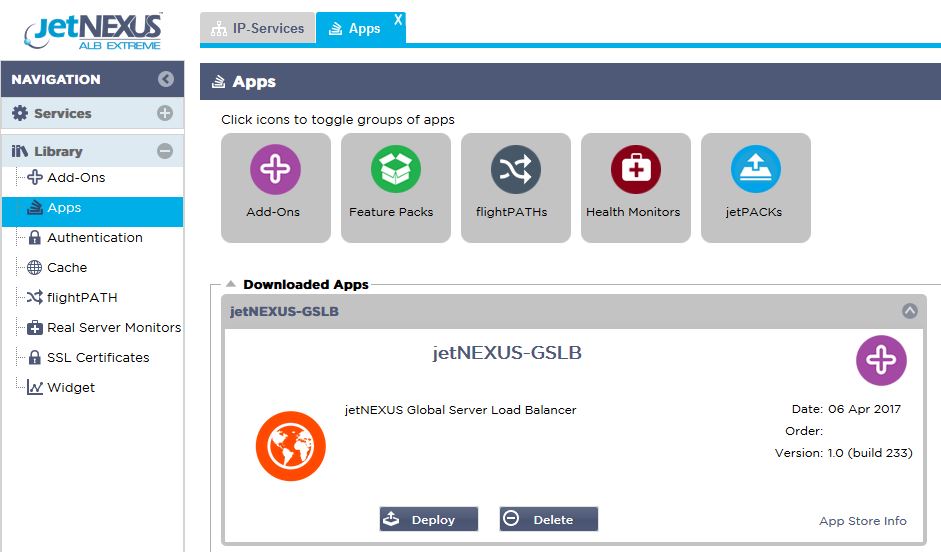
Figure 1: Deploy GSLB from Apps library
- Next, please configure edgeNEXUS GSLB Add-On details including “Container name”, “External IP” and “External Ports” in the Library → Add-Ons page of Edgenexus ALB-X GUI as shown in Figure 2.
- “Container Name” is a unique name of a running Add-On instance, hosted by Edgenexus ALB-X, it is used to distinguish multiple Add-Ons of a same kind.
- “External IP” is the IP on your network that will be assigned to edgeNEXUS GSLB.
- You must configure the GSLB to have an external IP address if you want to make GEO based decisions, as this will enable the GSLB to view the clients real IP address.
- “External Ports” is the list of TCP and UDP ports of edgeNEXUS GSLB, which are allowed to be accessed from other network hosts.
- Please put “53/udp, 53/tcp, 9393/tcp” in the “External Ports” input box to allow DNS (53/udp, 53/tcp) and edgeNEXUS GSLB GUI communications (9393/tcp).
- After configuring the Add-On details, please click “Update”.
- Start the edgeNEXUS GSLB Add-On by clicking the “Run” button.
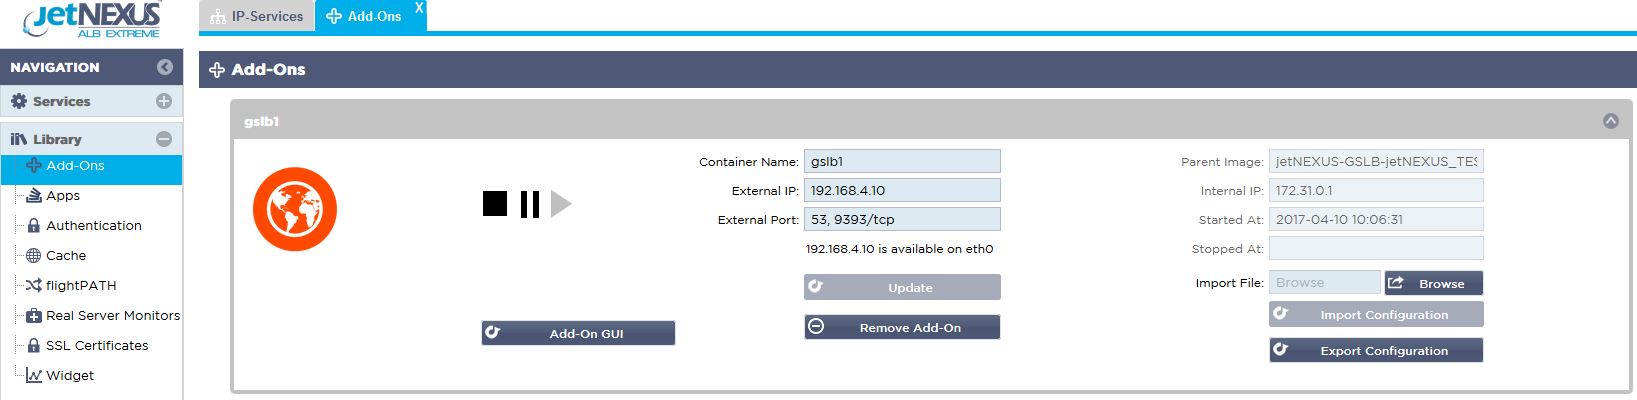
Figure 2: Update Add-On details and start GSLB
- The next step is to allow the edgeNEXUS GSLB Add-On to read and change Edgenexus ALB-X configuration.
- Please visit System → Users page of Edgenexus ALB-X GUI and edit a user which has the same name as the edgeNEXUS GSLB Add-On you have deployed as shown in Figure 3.
- Edit “gslb1” user and tick “API” then click “Update” – in later versions of the software this may already be ticked by default.
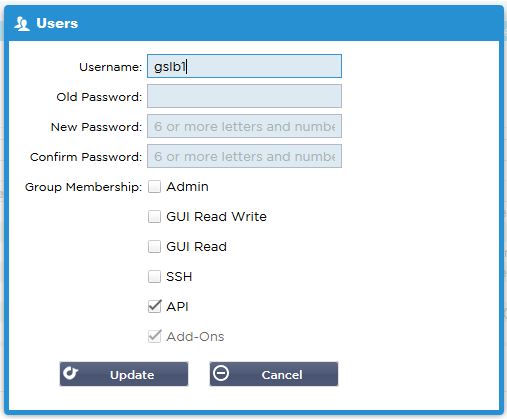
Figure 3: Add API memebership to GSLB username
- The next step is only required if you are configuring edgeNEXUS GSLB for testing or evaluation purposes and do not want to modify any DNS zone data on the internet.
- In this case, please instruct the Edgenexus ALB-X to use edgeNEXUS GSLB Add-On as its primary DNS resolving server by altering “DNS Server 1” in the System → Network page of Edgenexus ALB-X GUI as shown in Figure 4.
- DNS Server 2 can be configured normally with either your local DNS server or one out on the internet such as Google 8.8.8.8.

Figure 4: Add ALB-X DNS Server settings
- Now is the time to log in to edgeNEXUS GSLB GUI*.
- Please navigate to the Library → Add-Ons page of Edgenexus ALB-X GUI and click the “Add-On GUI” button.
- This will open a new browser tab which presents the edgeNEXUS GSLB GUI log in page as shown in Figure 5.
- The default user name is “admin” and the default password is “jetnexus”. Please don’t forget to change your password in the Administrator → My Profile page of edgeNEXUS GSLB GUI.
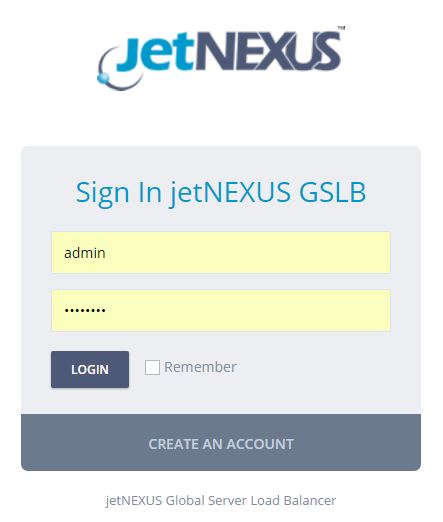
Figure 5: Log in to the edgeNEXUS GSLB GUI
* edgeNEXUS GSLB GUI is based on an Open Source project PowerDNS-Admin.
- The next step in the configuration sequence is to create a DNS zone in the PowerDNS nameserver, which is a part of edgeNEXUS GSLB, making it either an authoritative nameserver for the “example.org” zone or a subdomain zone, such as “geo.example.org” subdomain mentioned in the “DNS-based GSLB Overview” section above.
- For the in-depth details on DNS zone configuration please see the PowerDNS Nameserver documentation. An example zone is shown in Figure 6.
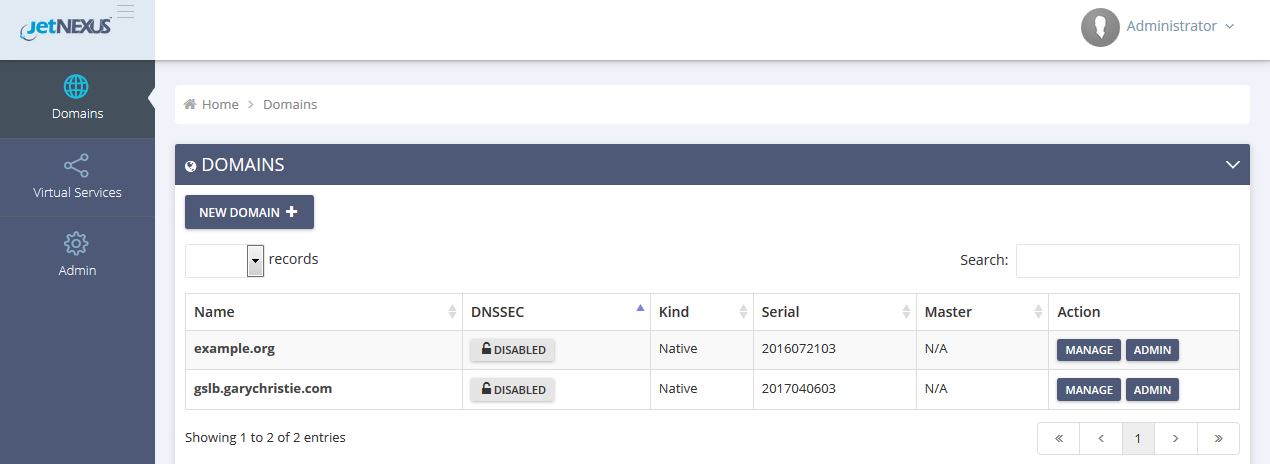
Figure 6: Add new domain or subdomain
- After having created a DNS zone please click the “Manage” button and add host names to the domain, as shown in Figure 7.
- After you edit any existing records within edgeNEXUS GSLB GUI, please press the “Save” button.
- After you have completed creating hostname records, please click the “Apply Changes” button. If you don’t click “Apply” and then amend the page, you will lose your changes.
- Below we have created records which are IPv4 address records.
- Please ensure you create a record for all of the records you wish to have resolved, including AAAA records for IPv6 addresses.

Figure 7: Add records to the domain or subdomain
- Now, let’s go back to Edgenexus ALB-X GUI and define a Virtual Service that corresponds to the DNS zone we have just created.
- The Virtual Service will be used for health checking of the servers in the GSLB domain.
- edgeNEXUS GSLB leverages the full power of the Edgenexus ALB-X health checking mechanism including custom monitors, it can be used with any of the Service Types supported by Edgenexus ALB-X.
- Please navigate to the Services → IP-Services page of Edgenexus ALB-X GUI and create a Virtual Service, as shown in Figure 8.
- Be sure to configure the Service Name with the correct domain name that you wish to use in the GSLB, the GSLB will read this via the API and automatically populate the Virtual Services section in the GSLB GUI.
- Please add all of the servers in the GSLB domain under the Real Servers section of the above page.
- You may specify servers, either by their domain names or IP addresses.
- If you specify the domain names then it will use the records created on your GSLB.
- You may choose different server health monitoring methods and parameters in the “Basic” and “Advanced” tabs.
- You may set the activity of some servers to “Standby” for an Active-Passive scenario.
- In this case if an “Online” server fails a health check and there is a healthy “Standby” server, edgeNEXUS GSLB will resolve the domain name to an address of the “Standby” server.
- Please refer to the Edgenexus ALB-X manual for details on configuring Virtual Services.
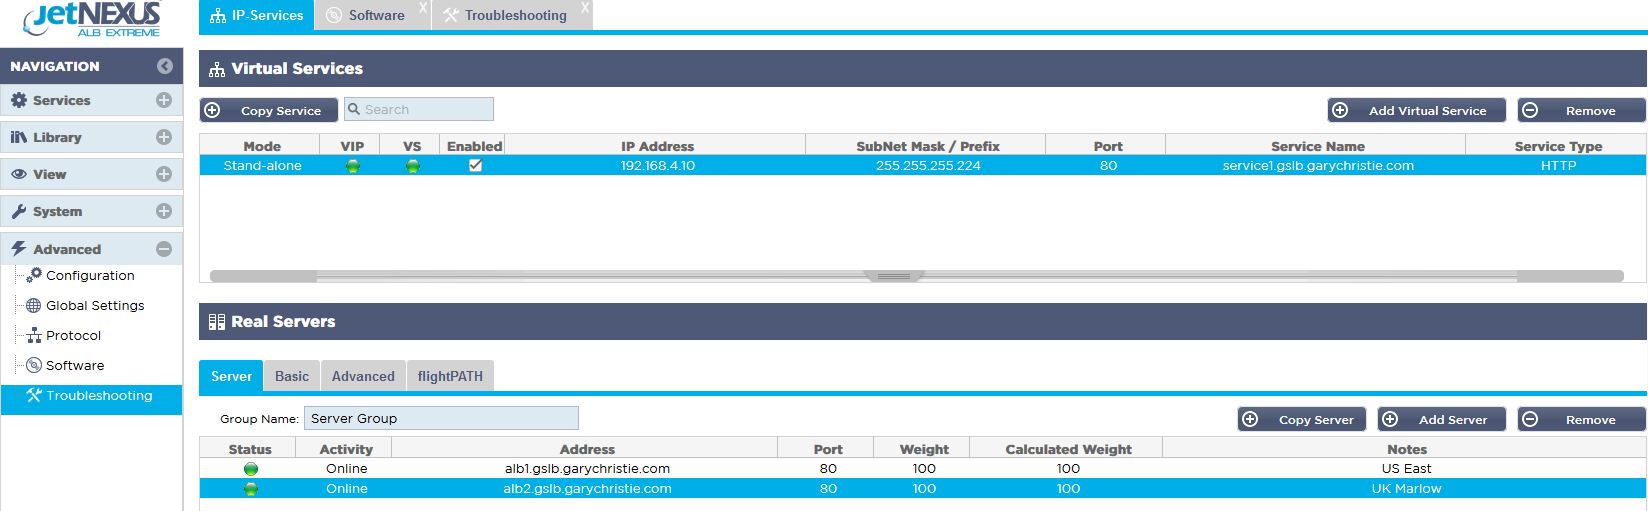
Figure 8: Add a Virtual Service
- Now, let’s move to the edgeNEXUS GSLB GUI.
- Navigate to the Virtual Services page and select a GSLB policy for the domain that has been retrieved by the API from the Edgenexus ALB-X virtual services section.
- This is shown in the Figure 9.
- edgeNEXUS GSLB supports the following GSLB Policies:
- 1. Fixed Weight: GSLB selects the server with the highest weight (Server weighting can be assigned by the user). In the case where multiple servers have the highest weight, GSLB will select one of these servers at random.
- 2. Weighted Round Robin: choose servers one by one, in a row. Servers that have higher weights are selected more often than servers that have lower weights.
- 3. Geolocation: Proximity – choose a server that is located closest to the client’s location using geographical latitude and longitude data. Servers in the same country as the client are preferred, even if they are more distant than servers in neighbouring countries.
- 4. Geolocation: City match – choose a server in the same city as the client. If there is no server in the client’s city, select a server in the client’s country. If there is no server in the client’s country, select a server in the same continent. If this is not possible, select a server that is located closest to the client’s location using geographical latitude and longitude data.
- 5. Geolocation: Country match – choose a server in the same country as the client. If there is no server in the same country, try the same continent, then try closest location.
- 6. Geolocation: Continent match – choose a server in the same continent as the client. If there is no server in the same continent, try closest location.
- After you have selected a GSLB Policy, please don’t forget to click the “Apply Changes” button.
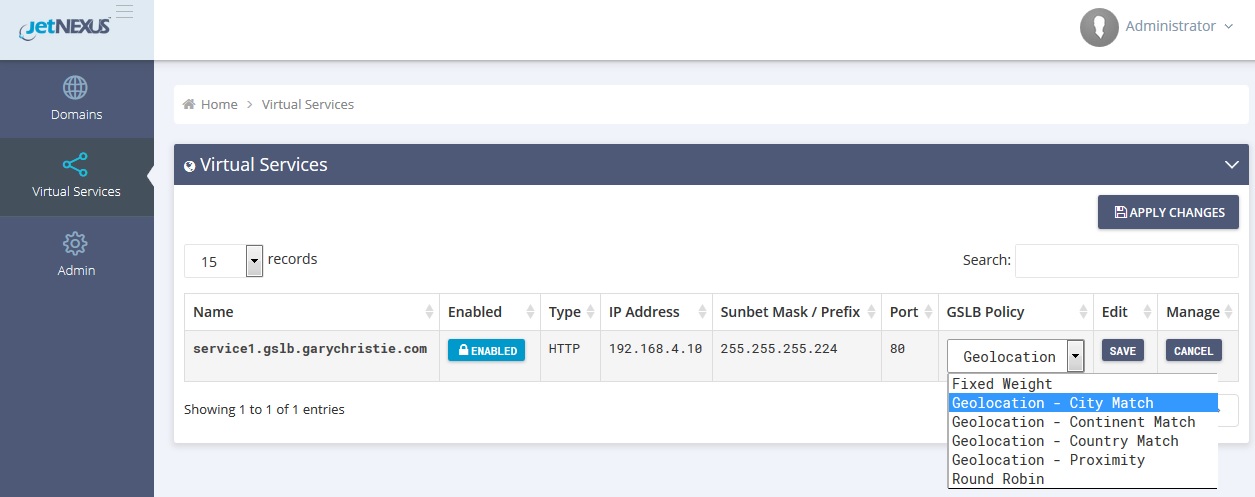
Figure 9: View GSLB Virtual Service
- Now you may review and adjust the Virtual Service details by clicking the “Manage” button.
- This will present a page shown in the Figure 10.
- If you have selected one of the weight-based policies you may need to adjust the server GSLB weights.
- If you have selected one of the geolocation-based GSLB Policies, you may need to specify geographical data for the servers.
- If you don’t specify any geographical data for the servers, edgeNEXUS GSLB will use the data provided by the MaxMind’s GeoLite2 database.
- You may also modify the server name, port and activity within this page.
- These changes will be synced with Edgenexus ALB-X when you click the “Apply Changes” button.
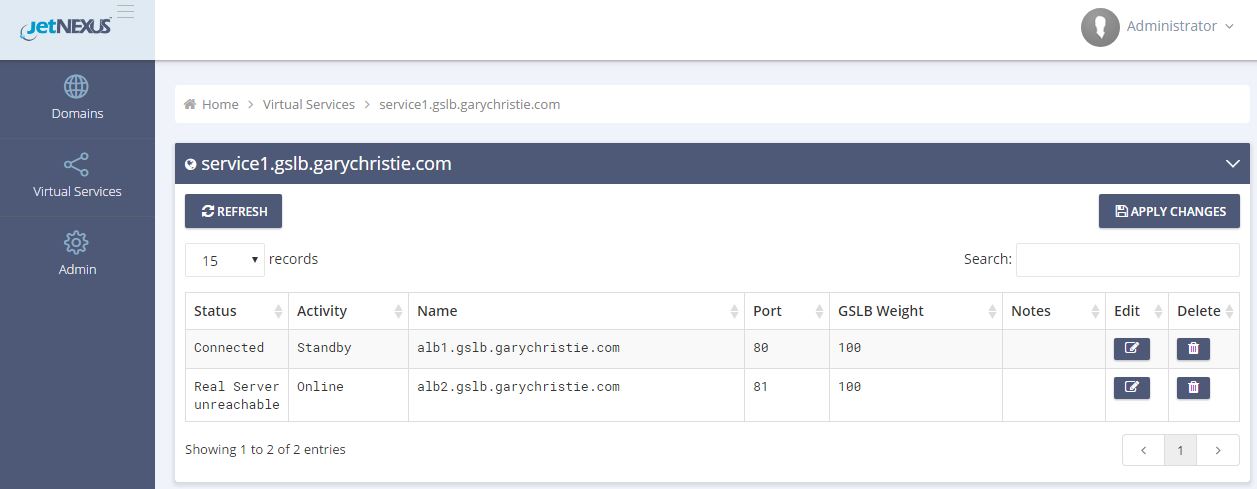
Figure 10: View GSLB Virtual Service server details
- A great way to check what answers the GSLB will send back to the clients is to use nslookup.
- If you are using Windows the command is below.
- nslookup service1.gslb.garychristie.com 192.168.4.10.
- Where service1.gslb.garychristie.com is the domain name of your service that you wish to resolve.
- Where 192.168.4.10 is the External IP Address of you GSLB.
- To check what IP address will be returned out on the internet you can use the google DNS server of 8.8.8.8.
- nslookup.service1.gslb.garychristie.com 8.8.8.8.
- Alternatively you can use something like https://dnschecker.org.
- Example https://dnschecker.org/#A/service1.gslb.garychristie.com.
- See figure 11. for an example of the results.
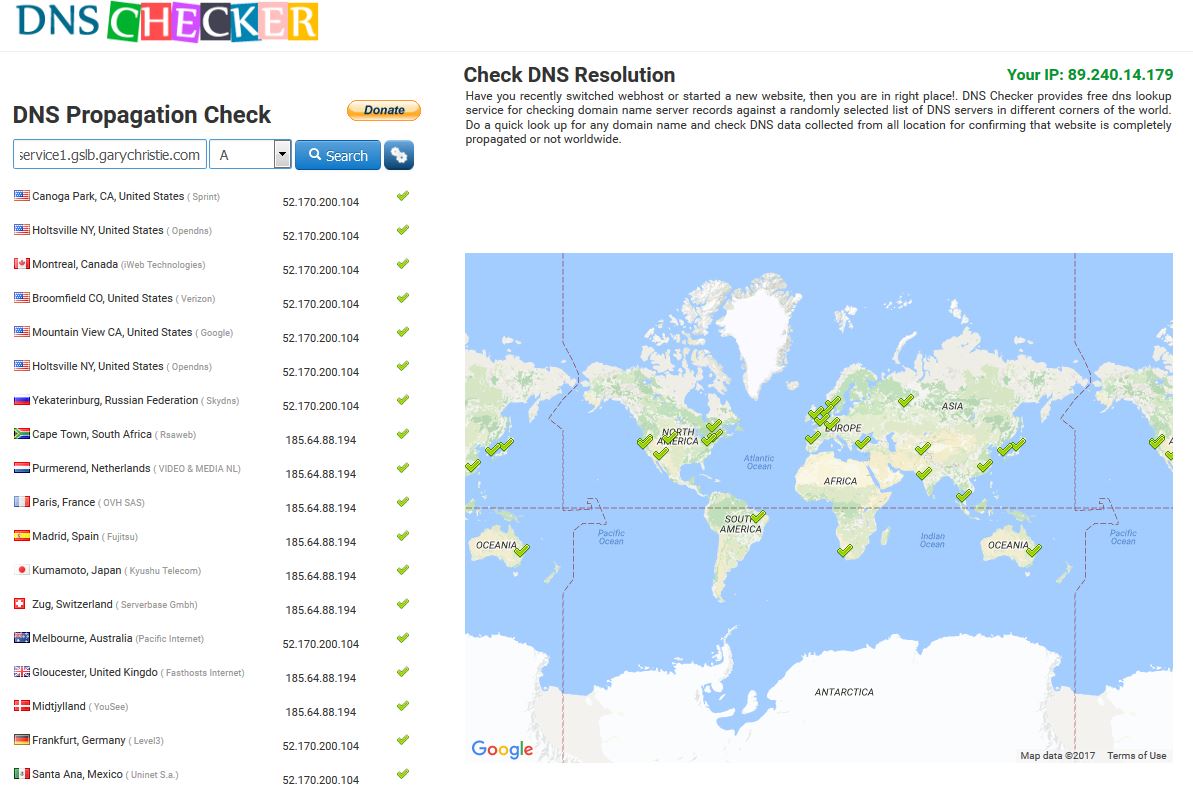
Figure 11: Worldwide DNS propogation results
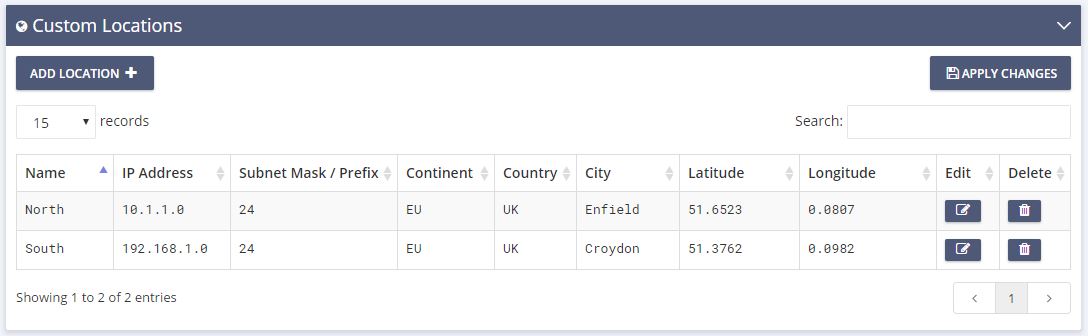
Custom Locations
Private Networks
edgeNEXUS GSLB can also be configured to use custom locations so that you can use it on internal “private” networks. In the scenario above the GSLB determines the client location by cross referencing the clients public IP address with a database to work out it’s location. It also works out the service IP address location from the same database and if the load balancing policy is set to a GEO policy it will return the closest IP address. This works perfectly well with public IP addresses but there is no such database for internal private addresses that conform to RFC 1918 for IPv4 addresses and RFC 4193 for IPv6 addresses.
Please see the Wikipedia page explaining private addressing https://en.wikipedia.org/wiki/Private_network
How it works
Typically the idea behind using our GSLB for internal networks is so that users from certain addresses will receive a different answer for a service depending on which network they are located in. So if we consider two data-centers one called “North” and one called “South” providing a service called north.service1.gslb.com and south.service1.gslb.com respectively. When a user from the Northern data-center queries the GSLB we want the GSLB to respond with the IP address associated with north.service1.gslb.com provided the service is working correctly. Alternatively if a user from the Southern data-center queries the GSLB we want the GSLB to respond with the IP address associated with south.service1.gslb.com again providing the service is working properly.
So what do we need to do in order to make the above scenario happen?
- We need to have at least two Custom Locations, one for each data-center
- Assign the various private networks to these locations
- Assign each service to the respective location
How do we configure this look on the GSLB?
Add a location for the Northern Data Center
- Click on Custom Locations on the left hand side
- Click Add Location
- Name
- North
- Add a private IP address and subnet mask for your Northern network. For this exercise we will assume that the service and the client IP addresses are in the same private network
- 10.1.1.0/24
- Add the Continent code
- EU
- Add the Country code
- UK
- Add City
- Enfield
- Add Latitude – obtained from google
- 51.6523
- Add Longitude – obtained from google
- 0.0807
Note please use the correct code’s which can be obtained from here
Add a location for the Southern Data Center
- Click on Custom Locations on the left hand side
- Click Add Location
- Name
- South
- Add a private IP address and subnet mask for your Southern network. For this exercise we will assume that the service and the client IP addresses are in the same private network.
- 192.168.1.0/24
- Add the Continent code
- EU
- Add the Country code
- UK
- Add City
- Croydon
- Add Latitude – obtained from google
- 51.3762
- Add Longitude – obtained from google
- 0.0982
Note please use the correct code’s which can be obtained from here
Figure 12.
Add an A record for north.service1.gslb.com
- Click on the domain service1.gslb.com
- Click Add Record
- Add Name
- north
- Type
- A
- Status
- Active
- TTL
- 1 Minute
- IP Address
- 10.1.1.254 (Note this is in the same network as the location Enfield)
Add an A record for south.service1.gslb.com
- Click on the domain service1.gslb.com
- Click Add Record
- Add Name
- south
- Type
- A
- Status
- Active
- TTL
- 1 Minute
- IP Address
- 192.168.1.254 (Note this is in the same network as the location Croydon)
Figure 13.

Traffic Flow
Example 1 – Client in Northern Data-Center
- Client IP 10.1.1.23 queries GSLB for service1.gslb.com
- GSLB looks up the IP address 10.1.1.23 and matches it with Custom Location Enfield 10.1.1.0/24
- GSLB looks at it’s A records for the service1.gslb.com and matches north.service1.gslb.com as it is also in the network 10.1.1.0/24
- GSLB responds to 10.1.1.23 with the IP address 10.1.1.254 for service1.gslb.com
Example 2 – Client in Southern Data-Center
- Client IP 192.168.1.23 queries GSLB for service1.gslb.com
- GSLB looks up the IP address 192.168.1.23 and matches it with Custom Location Croydon 192.168.1.0/24
- GSLB looks at it’s A records for the service1.gslb.com and matches south.service1.gslb.com as it is also in the network 192.168.1.0/24
- GSLB responds to 192.168.1.23 with the IP address 192.168.1.254 for service1.gslb.com
 Back to Top