jetNEXUS VPN Add-On
Introduction
jetNEXUS VPN Add-On creates a Virtual Private Network (VPN) interconnecting ALBs which are running in different offices, data centres or clouds providing a flat network between your ALBs for data traffic exchange or remote management in a very simple way.
Before You Begin
To make routing across VPN possible please make sure that all ALBs which you are going to connect to the VPN have different Add-Ons (Docker) network addresses.
Installation
Please purchase and download jetNEXUS VPN Add-On from App Store and deploy it on every ALB which you want to interconnect with the VPN. After deploying the VPN Add-On please go to the “Library -> Add-Ons” section of the ALB GUI and configure a Container Name, External IP and External Ports of the VPN Add-On as shown in the Figure 1.
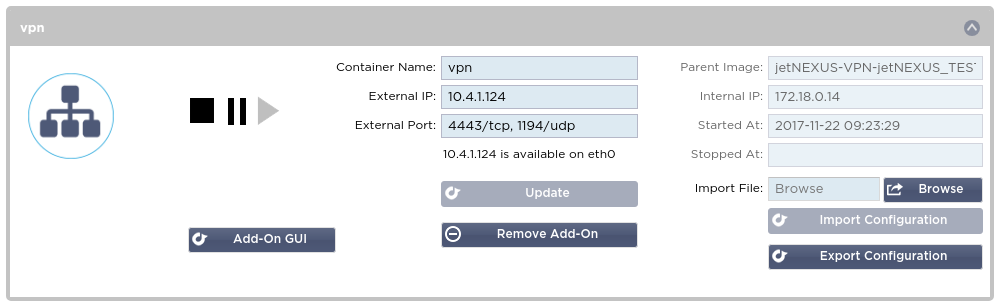
Figure 1. VPN server container configuration
Please choose a name for the container consisting of letters and digits only.
jetNEXUS VPN Add-On is using the following ports:
- TCP port 4443 for providing access to its GUI over HTTPS protocol;
- TCP port 80 for providing access to its GUI over unencrypted HTTP protocol;
- UDP port 1194 is used for the VPN traffic exchange between ALBs.
External IP is the IP which will be used for accessing the VPN Add-On GUI and for making the VPN connections. On the ALB which is going to be a VPN server the External IP must be accessible by the other ALBs over the Internet, i.e. must be a public IP address. On client ALBs the External IP may be a private IP address which is allowed to access Internet (it must be allowed to connect to the public IP of the VPN server).
After having configured the container parameters please click the “Update” button and after the parameters are updated please click the “Play” button to start the container.
Alternatively to configure a containers External IP you may define a Virtual Service in the “Services -> IP Services” section of the ALB GUI. In this case you may create a HTTP type service for the VPN Add-On GUI on port 80 and a Layer 4 UDP type service for the VPN Add-On traffic port 1194. Defining a Virtual Service for the VPN Add-On GUI access is preferable if you are going to make the VPN Add-On GUI accessible from an untrusted network because in this case you may apply an official SSL certificate for GUI traffic encryption and validation. In case of accessing the VPN Add-On GUI on its container External IP the VPN Add-On GUI traffic will be encrypted with a self-signed SSL certificate which may be used on trusted networks only. Please refer to jetNEXUS ALB manual for more information on Virtual Services.
VPN Server Configuration
After configuring and starting a VPN server container please open its GUI. When prompted for authentication please use “admin” for login and “jetnexus” for password. After your first login you will see an unconfigured VPN Add-On GUI as shown in the Figure 2.

Figure 2. Unconfigured VPN Add-On
Before doing any configuration changes please navigate to the Admin Password page, shown in the Figure 3, and change the default admin password.
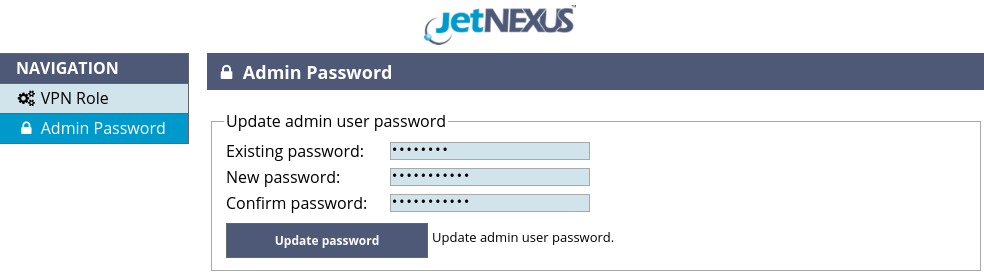
Figure 3. Admin password change
Now you are ready to do the actual configuration of the VPN server. Please navigate to the VPN Role page of the VPN Add-On GUI, shown in the Figure 2, select the “Enable remote connections to this ALB” option and click the “Update VPN Role” button. After changing the VPN role, the VPN Add-On GUI will look like shown in the Figure 4.
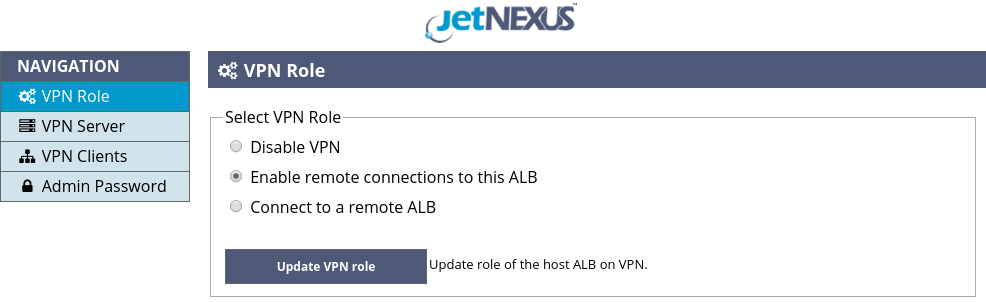
Figure 4. Select VPN role: server
Now please navigate to the “VPN Server” page, shown in the Figure 5.
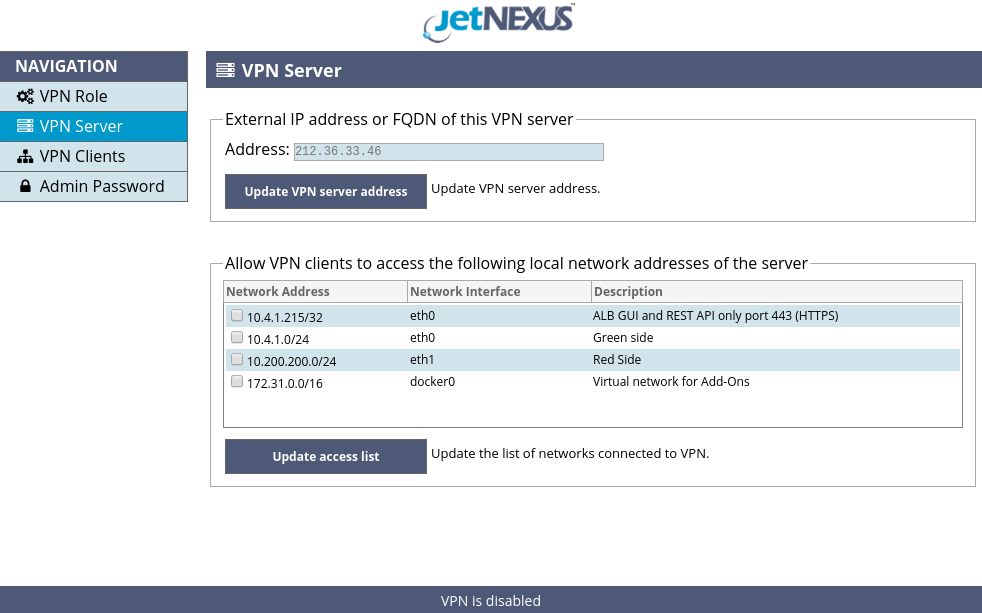
Figure 5. VPN Server page
Please enter an external (public) IP address or a fully qualified domain name (FQDN) of the VPN server in the Address input field and click the “Update VPN server address” button to apply. jetNEXUS VPN Add-On will try to guess the public IP address of the VPN server and suggest it in the Address input field.
The guessed IP address is only a hint, not the actual contents of the input field, please type the suggested IP address or a proper one. After initially setting or altering an external IP address of the VPN server the VPN Add-On will create new SSL certificates for clients authentication and traffic encryption – this may take up to several minutes depending on your hardware performance and entropy pool availability – please do not close or reload the page while the changes are applied.
After the external IP address or FQDN is configured and SSL certificates are created please select local networks of the VPN server’s host ALB which are allowed to be accessed by VPN clients and their host ALBs.
You may allow full access to the selected networks or allow access only to the GUI and REST API management port of the VPN server’s host ALB. You may also leave all access denied – in this case VPN server will only forward traffic from one VPN client to another and will not allow access to any of its host ALB’s networks. Please click the “Update access list” button to apply the access control changes.
Now, when the VPN server is configured, please navigate to the VPN clients page of the VPN Add-On GUI, shown in the Figure 6.
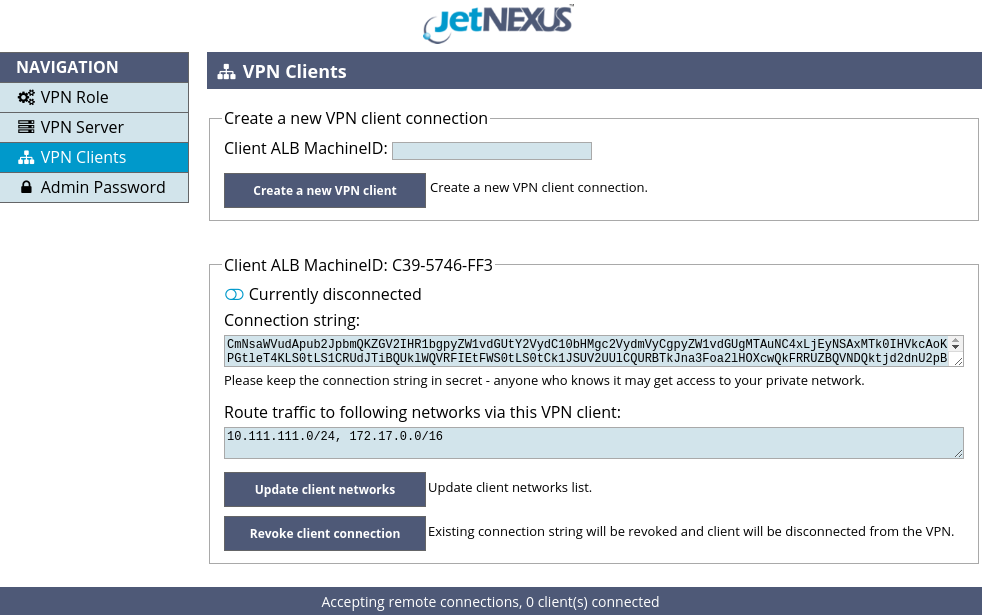
Figure 6. Create a new VPN client
To register a new VPN client and create a connection string please enter a MachineID of the VPN client’s host ALB and click the “Create a new VPN client” button. MachineID can be found in the “System -> Licence” page of client’s host ALB GUI.
After creating a new VPN client please fill in the “Route traffic to following networks via this VPN client” input field and click the “Update client networks” button. Please put in this field all of the local networks of the VPN client’s host ALB, which you want to make accessible from the VPN, plus the Docker network address of the VPN client’s host ALB.
If you don’t put in the Docker network address, there will be no access from the VPN even to the management port of the host ALB running the VPN Add-On in client mode. This input field controls network traffic routing, i.e. it “tells” the VPN server which private networks may be accessed via a specific VPN client. The VPN server pushes these routes to the other VPN clients in order to enable clients communicate with each other.
Listing client’s local networks in the “Route traffic to following networks via this VPN client” input field is not insecure, as it does not permit access to the listed networks from the VPN – it is only intended for traffic routing. You may control access to a client’s local networks in the “VPN Connection” page of the VPN client (please see Figure 9), where you can select which networks of the VPN client’s host ALB are allowed to be accessed from the VPN and which are not.
By default all incoming connections from VPN to an ALB host and private networks behind the ALB are disabled.
You may remove a VPN client by clicking the “Revoke client connection” button. The connection string will be revoked and the client will be disconnected from the VPN.
VPN Client Configuration
After deploying jetNEXUS VPN container on a client ALB please configure access to the VPN Add-On’s GUI either by defining an External IP and an External port as shown in the Figure 7, or by creating a Virtual Service in the “Services -> IP Services” section of the ALB GUI – similar to how you configured the VPN server container before. Please refer to jetNEXUS ALB manual for more information on Virtual Services.
There is no need to allow access to the UDP port 1194 for a VPN client, as it is the VPN server who is expecting incoming connections from clients, thus VPN clients are not required to expose their IP address and port to the public network.
Figure 7. VPN client container configuration
After having configured the container parameters please click the “Update” button and after the parameters are updated please click the “Play” button to start the container, then please open the VPN Add-On GUI. When prompted for authentication please use “admin” for login and “jetnexus” for password. Before doing any configuration changes please navigate to the Admin Password page, shown in the Figure 3, and change the default admin password.
Please navigate to the VPN Role page of the VPN Add-On GUI, select the “Connect to a remote ALB” option, as shown in the Figure 8, and click the “Update VPN Role” button.
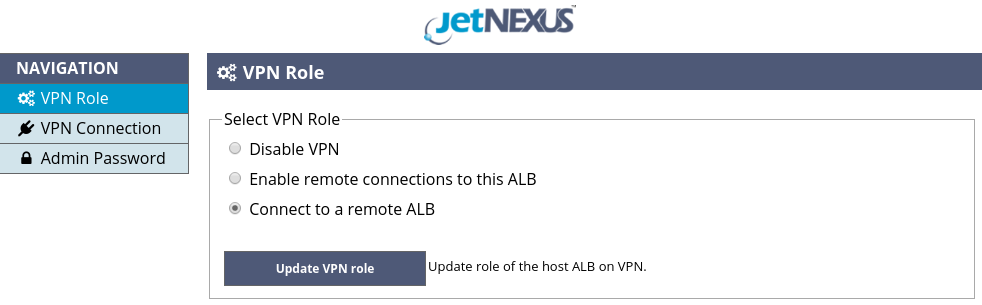
Figure 8. Select VPN role – client
After selecting the VPN role please navigate to the “VPN Connection” page of the VPN Add-On GUI shown in the Figure 9.

Figure 9. VPN Connection page
You are now ready to connect to the VPN server. Please open the VPN server GUI in another browser tab and navigate to the “VPN Clients” page. Please find a section matching the MachineID of the client ALB you are configuring and click the text area labeled “Connection string”, as shown in the Figure 10, – this will copy the client’s connection to clipboard.
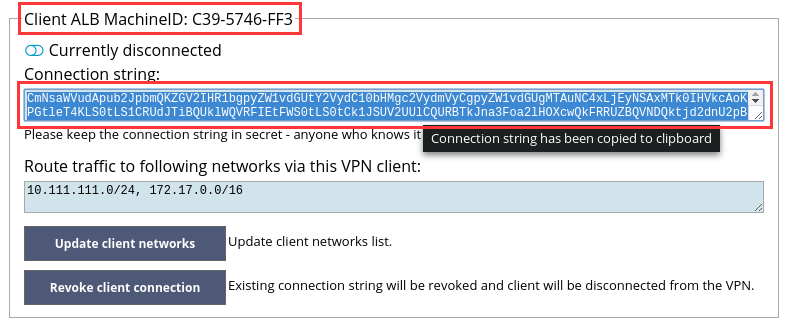
Figure 10. Copy client connection string to clipboard
Then please open the browser tab with the client VPN Add-On GUI and paste the connection string to the “Connection string” text area of the client. Finally click the “Connect to a remote ALB” button.
If everything is configured correct after about 5 seconds the status text in the bottom of the client VPN Add-On GUI page will change to “Connected to remote ALB” as shown in the Figure 11
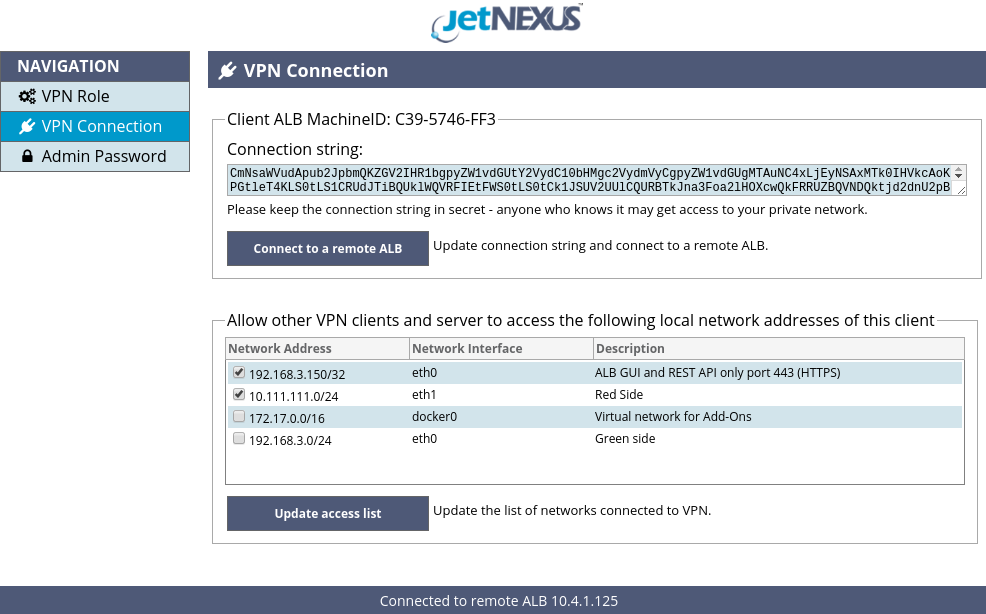
Figure 11. VPN client status: Connected to remote ALB
You may now select which local networks of the VPN client’s host ALB may be accessed by the VPN server and the other VPN clients and their host ALBs. You may allow full access to the selected networks or allow access only to the GUI and REST API management port of the VPN client’s host ALB. Please click the “Update access list” button to apply the access control changes.
You may also check connections statuses of all VPN clients in the VPN Clients page of VPN server GUI as shown in the Figure 12.

Figure 12. VPN clients statuses
Advanced Configuration
jetNEXUS VPN Add-On automatically adds and removes VPN routes on the host ALB when VPN topology changes. However if you want to route traffic of the other hosts on your private network to another private network connected to the VPN using ALB as a gateway, you have to manually configure routes on the other hosts on your private networks.
In this case please set default gateway IP address on the other host of your private network to the ALB’s private network IP address and add routes to all of the intermediate networks: your local VPN client ALB’s Docker network, the VPN server ALB’s Docker network, the remote private network’s VPN client ALB’s Docker network and finally to the remote private network. Please also configure routing on the remote network host in a similar way.
Let’s consider an example network shown in the Figure 13. There are three private networks interconnected with jetNEXUS VPN Add-On: 10.1.1.0/24, 10.1.2.0/24 and 10.1.3.0/24. ALBs on the private networks 1 and 2 are running jetNEXUS VPN Add-On in client mode. ALB on the private network 3 is running jetNEXUS VPN Add-On in server mode.

Figure 13. Example network
jetNEXUS VPN Add-On is running in a Docker container and therefore VPN clients and VPN server are connected to virtual Docker networks, each of which adds another hop to the network route from one private network to another.
In order to let the hosts 10.1.1.10 and 10.1.2.20 on the private networks 1 and 2 communicate with each other the following routes should be added.
| On the host 10.1.1.10: | On the host 10.1.2.20: |
|
|
In order to let the hosts 10.1.1.10 and 10.1.3.30 on the private networks 1 and 3 communicate with each other the following routes should be added.
| On the host 10.1.1.10: | On the host 10.1.3.30: |
|
|