Hardware Installation Guide
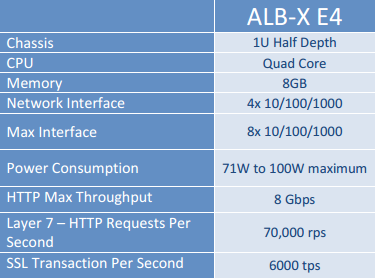
ALB-X E4
Hardware Specification
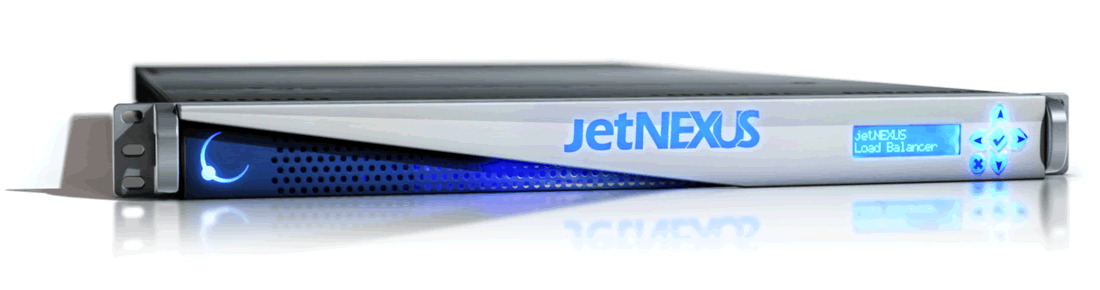
Front Aspect
Rear Aspect

Serial Console Settings
| Baud |
38400 |
| Parity |
no |
| Bits |
8 |
| Stop Bit |
1 |
Basic Configuration
First Boot
Please ensure you have plugged in a live ethernet cable into eth0. On first boot the jetNEXUS ALB-X will try and obtain an IP address using DHCP. If there is no DHCP server present it will boot with it’s default IP address of 192.168.100.100. On subsequent boots DHCP is disabled.
You now have three ways to setup your jetNEXUS ALB-X. The simplest way to initially configure your jetNEXUS ALB-X is via the edgeNEXUS Discovery Application.
edgeNEXUS Discovery Application
You can obtain the edgeNEXUS Discovery Application from here
edgeNEXUS Discovery is designed to make the initial configuration of the jetNEXUS ALB-X easy. The application can be installed onto a desktop and will scan the local network for edgeNEXUS devices. Please ensure the jetNEXUS ALB-X and the computer that is running jnDiscovery are on the same network. Once found, essential information such as an initial management IP address can be easily assigned.
How to use edgeNEXUS Discovery
Copy the edgeNEXUS application onto your desktop and run the installation. After the installation is complete double click on the Discover Icon to launch the edgeNEXUS discovery application.

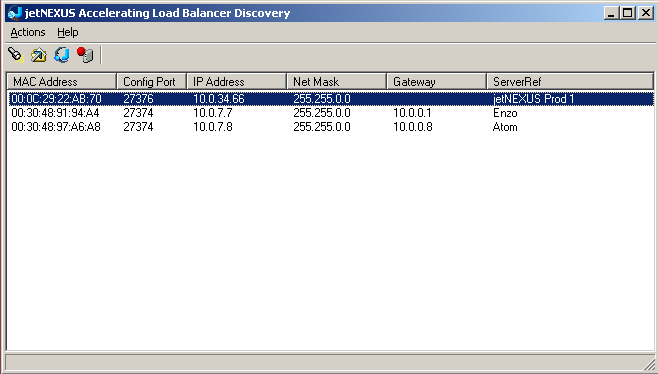
The edgeNEXUS Accelerating Load Balancer Discovery will then open, showing you a list of edgeNEXUS appliances in your network.
Right click on the on device you would like to configure and select “configure”.
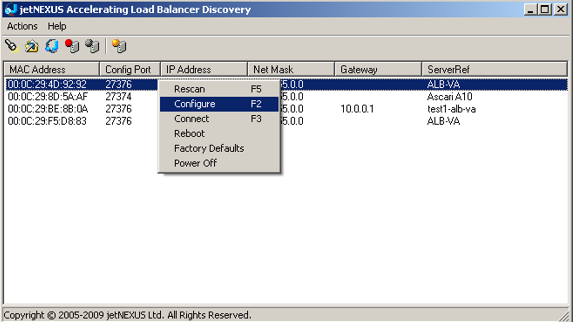
A message box like the following below will then pop up. Note this ALB-X has not been able to find a DHCP serer so has assigned the default IP Address of 192.168.100.100/24.
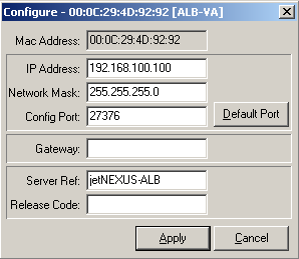
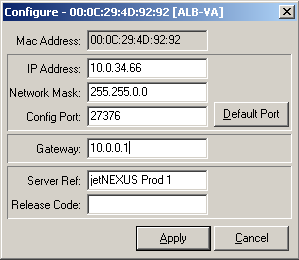
You will be prompted for the following information:
IP Address:
The management IP address of the jetNEXUS ALB-X.
Network Mask:
The Network Mask of the jetNEXUS ALB-X management IP
Configuration Port:
The Configuration Port of the secure Graphical User Interface (GUI)
Gateway:
The Default Gateway. This is needed to gain access from browsers not on the local subnet.
Server Ref:
A name to identify the jetNEXUS ALB-X
In this example we have configured the following details:
Once you click on the Apply button you will be prompted for the password:
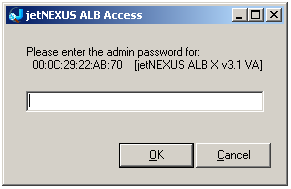
The default password is: jetnexus
Your Configured device with the new IP,Subnet and ServerRef will now show in the discovery screen.
Double click on the ALB you would like to configure and it will load the web admin in a browser:

Please ignore the warning and click “Continue to this website”. This will take you to the GUI for further configuration.
The User Guide is available here
Command Line
Login Details
Default username= admin
Default password = jetnexus
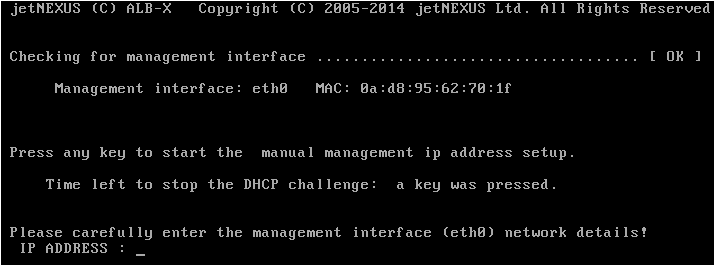
First Boot – Manual Network Details
Upon first boot you will have a 10s opportunity to interupt automatic assignment of IP details via DHCP
To interupt click into the console and press any key
You can then enter the following details manaully
IP Address
Subnet Mask
Gateway
DNS Server
First Boot – DHCP successful
If you do not interrupt when prompted then your jetNEUXS ALB-X willl then try to conntact a DHCP server to assign it’s network details
If contact is successful then your machine will be assign the following details
IP Address
Subnet Mask
Default Gateway
DNS Sever
These changes will survice after reboot and dont need to be configured again on the GUI
First Boot – DHCP Fails
If you do not have a DHCP server or the connection fails then the IP Adress 192.168.100.100 will be assigned
The IP address will increase by 1 untill a free address is found
If 192.168.100.100 is already assigned to the network then it will assign 192.168.100.101 and so on
Change the Management IP Address

Change the Subnet Mask for eth0

Assign a Default Gateway

Check the Default Gateway has been added

You should now be able to access the Graphical User Interface (GUI)
Default GUI address = https://
Default Secure port = 443
Default Username = admin
Default Password = jetnexus
The User Guide is available here
Command Reference Table
| Command |
Parameter1 |
Parameter2 |
Description |
Example |
| date |
|
|
This will show the configured date and time that is currently configured |
Tue Sept 3 13:00 UTC 2013 |
| defaults |
|
|
Assign the factory default settings for your appliance |
|
| exit |
|
|
Log out of the command line interface |
|
| help |
|
|
Displays all valid commands |
|
| ifconfig |
[blank] |
|
View the interface configuration for all interfaces |
ifconfig |
|
eth0 |
|
View the interface configuration of eth0 only |
ifconfig eth0 |
| machineid |
|
|
This command will provide the machineid used to licence the jetNEXUS ALB-X |
EF4-3A35-F79 |
| quit |
|
|
Log out of the command line interface |
|
| reboot |
|
|
Terminate all connections and reboot the jetNEXUS ALB-X |
reboot |
| restart |
|
|
Restart the jetNEXUS ALB-X virtual services |
|
| route |
[blank] |
|
View the routing table |
route |
|
add |
default gw |
Add the default gateway IP address |
route add default gw 192.168.100.254 |
| set |
greenside |
|
Set the management IP address for ALB-X |
set greenside=192.168.101.1 |
|
mask |
|
Set the subnet mask for an interface. Interface names are eth0, eth1…. |
set mask eth0 255.255.255.0 |
| show |
|
|
Displays the global configuration settings |
|
| shutdown |
|
|
Terminate all connections and power-off the jetNEXUS ALB-X |
|
| status |
|
|
Displays the current data statistics |
|
| top |
|
|
View the process information such as CPU and Memory |
|
| viewlog |
messages |
|
Displays the raw syslog messages |
viewlog messages |
Please note: Commands are not case sensitive. There is no command history.
Graphical User Interface
Please access your GUI interface at location https://:27376 for all builds prior to 3.54.1 (Build 1540)
The default port has now been changed to 443 for all builds deployed after April 2014 and Software version 3.54.1 (Build 1540)
https://
View the User Guide here