Edgenexus ALB-X Exchange 2013 Deployment Guide
Pre-requisites
Synopsis
Overview
Why Edgenexus?
What is a jetPACK?
Exchange 2013 jetPACK
Exchange 2013 Description
HTTPS Deployment
Single Virtual Server with Single CAS group
Multiple Virtual Servers with Multiple CAS groups
Troubleshooting
Contact Us
Pre-requisites
The following are general prerequisites and
configuration
notes for this guide:
-
- It is assumed that the reader is a
network administrator or person familiar with networking and general
computer terminology
- It is assumed that the reader is a
-
- You have set-up your Microsoft
Exchange 2013 environment and have installed your Edgenexus
ALB-X application delivery controller
- You have set-up your Microsoft
- When
Microsoft refer to a hardware
load balancer (HLB), this can either be a physical hardware appliance,
or a virtual appliance load balancer. It is also equivalent to
the industry term for such appliances, namely “Application
Delivery Controller (ADC)” - You are running Software Version 3.53.2 (Build 1510) or later on your Edgenexus ALB-X
Synopsis
This deployment guide explains briefly the concept of Exchange
2013 and how to use an ALB-X to load balance Exchange 2013 Traffic.
Overview
The ALB-X is an Application Delivery Controller (ADC)
sometimes referred to as a next generation load balancer.
This document assumes that you are already familiar
with using the ALB-X GUI.
This document assumes that you are already familiar
with the process of installing Exchange 2013 and creating a CAS Array.
Why Edgenexus?
| Layer 4 & Layer 7 Load Balancing |
Application layer server health checks are able to detect and route around problems to eliminate downtime |
|
| Reverse Proxy | Edgenexus ALB-X can provide Reverse-Proxy authentication and secure remote access to all Exchange HTTP-based client access services |
|
| Compression | Content Compression features improve client performance | |
| SSL Re-Encryption | Enables end-to-end secure encrypted traffic between client and internal resources whilst still being able to provide acceleration and traffic manipulation with flightPATH |
|
| flightPATH | Edgenexus ALB-X is able to intelligently redirect clients to the correct resources | |
| jetPACK | Quick and easy deployment using jetPACK application templates |
What is a jetPACK?
A jetPACK is a simple text file that you can upload to your appliance
that contains all of the configuration needed to deploy an application
such as Exchange 2013.
For more information on jetPACK see below.
jetPACK
| The Edgenexus ALB-X can be configured automatically with an Exchange 2013 “jetPACK” template, which is fully-tuned with all of the application-specific settings that you need in order to enjoy optimised service delivery from your ALB-X |
||
| If you supply the virtual IP address and real server IP addresses to support@edgenexus.io we will send you a custom jetPACK that you simply upload to the Edgenexus ALB-X |
||
| The upload can be done via the GUI and will result in a fully configured ALB-X within less than 1 minute |
||
| The relevant jetPACK can be applied to multiple jetNEXUS ALB-X appliances saving valuable time and eliminating simple mistakes |
||
| To download a jetPACK please visit http://www.edgenexus.io/usercentral/3-55-1/jetpack.html |
Exchange 2013 Description
What’s new in Microsoft Exchange 2013?
The most important change is the separation of server roles to Client
Access Server (CAS) and Mailbox server. The Client Access Server’s
primary role is a proxy that connects and authenticates clients to the
Exchange 2013 Mailbox Server. The Mailbox server hosts mailbox
databases and components previously associated with other exchange
Server Roles. As a result of this change persistence or ‘sticky
sessions’ are not required on load balancers.
Client Access Server (CAS) Role
- The Client Access Server (CAS) role accepts connections from a variety
of clients to allow them access to the Exchange Server infrastructure - Houses the logic to redirect a specific protocol request from a client to the correct Mailbox server
- No longer needs session affinity
- Handles all inbound and outbound external SMTP traffic via the Front End Service and provide client endpoint for SMTP traffic
Front End Transport Services
The Front End transport service on the Client Access server proxies the
incoming and outgoing SMTP message traffic. The Front End Transport
service quickly selects a single healthy Mailbox server to receive an
incoming SMTP message transmission.
Outlook Connectivity
In Exchange 2013, RPC/TPC has been removed and all Outlook connections take place via Outlook Anywhere (RPC over HTTP).
This provides several benefits:
- Simplifies the protocol stack
- Provides a reliable and stable connectivity model
- Maintains the RPC session on the Mailbox server that hosts the active copy of the user’s mailbox
- Eliminates the need for the RPC Client Access Array and its namespace
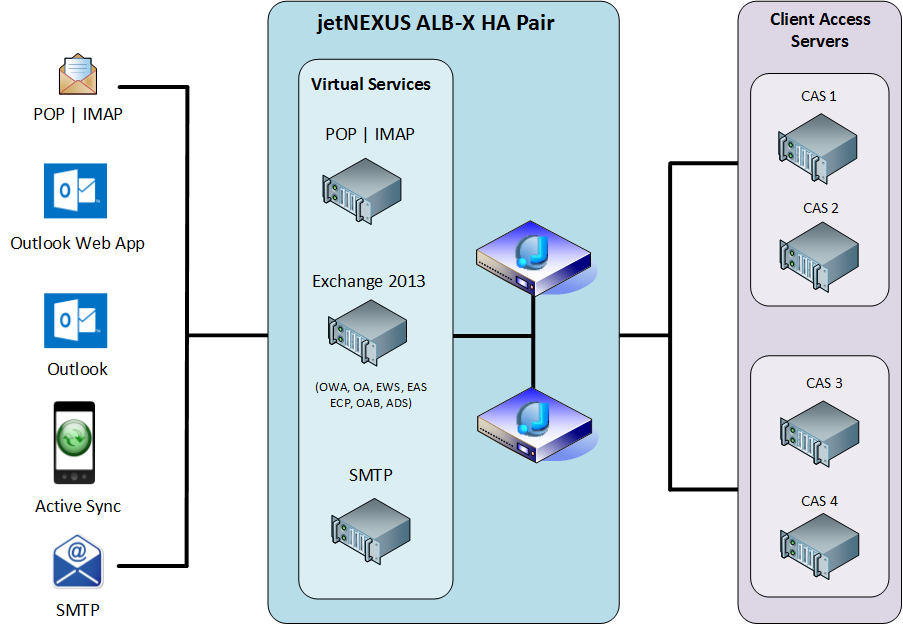
Standard Exchange 2013 Diagram
Diagram 1.1
Exchange 2013 Port Requirements
CAS Service Name |
Protocol |
TCP Port |
Description |
| Outlook Anywhere | HTTPS | 443 | Also known as RPC over HTTP, allows client using Microsoft Outlook 2007, 2010 and 2013 to connect to their Exchange Servers |
| Exchange Web Services (EWS) | HTTPS | 443 | Provides client applications to communicate to Exchange Servers |
| Outlook Web App (OWA) | HTTPS | 443 | Provides access to Outlook and emails through a web browser |
| Exchange Active Sync (EAS) | HTTPS | 443 | Mobile Synchronisation |
| Autodiscover (ADS) | HTTPS | 443 | Automatic configuration and profile settings |
| Exchange Control Panel (ECP) | HTTPS | 443 | New web-based Exchange Admin Center |
| Offline Address Book (OAB) | HTTPS | 443 | Provides a copy of the address book viewable when disconnected |
| Powershell (PS) | HTTPS | 443 | Provides a powerful command line interface for administration tasks or automation |
| SMTP | SMTP/SMTPS | 25/465 | Simple Message Transport Protocol |
| POP3 | POP3/POP3S | 110/995 | Post Office Protocol 3 supports offline mail processing |
| IMAP4 | IMAP4/IMAP4S | 143/993 | Interactive Mail Access Protocol replicates folder structure |
HTTPS Deployment
The Exchange 2013 HTTPS services can be deployed in 2 scenarios:
Deployment Type |
Pros |
Cons |
| Single Server with Single CAS group | Quick setup manually or jetPACK Consumes less resources on ALB-X Single Virtual IP address |
Only one health monitor for all HTTPS services |
| Multiple Virtual Servers with Multiple CAS groups | Quick setup with jetPACK Health and performance monitoring per service |
Multiple external IP addresses and URL’s |
Certificate Requirements
All HTTP traffic to the Client Access Servers is encrypted using SSL
certificates. Please use the same certificate that is shared among the Client Access Servers.
A single certificate using Subject Alternative Name (SAN) extension can
be used to support all services on a Edgenexus ALB-X and Client Access
Server.
Importing a certificate
Navigate to Configure — SSL Certificates — Import Certificates
This section allows you to import a signed certificate from a trusted
Certificate Authority (CA). The signed certificate must be in PKCS#12
format. This container format can contain multiple embedded objects,
such as multiple certificates and is usually protected with a password.
To import your certificate:
- Give your certificate a name like Exchange 2013 Certificate
- Type the password you used to create the PKC#12 container
- Browse for the Exchange2013Certificate.pfx
- Click Upload
- Your certificate will now appear in the Basic SSL drop down
Content Server Monitoring
Navigate to Configure — Content Server Monitoring
- Click Add Record
- Double click in the Name column and enter the name of your monitor
- Tab to Description and enter an appropriate description
- Tab to Monitoring Method and choose HTTP Response from the drop down menu
- Tab to Page Location and enter a page location detailed in the table below
- Tab to Required Content and enter 200 OK
The following table details all of the Real Server Monitors that can be applied to a Channel/Virtual Server
Name |
Description |
Monitoring Method |
Page Location |
Required Content |
| Monitoring OWA | Outlook Web App | HTTP Response | /owa/healthcheck.htm | 200 OK |
| Monitoring OA | Outlook Anywhere | HTTP Response | /rpc/healthcheck.htm | 200 OK |
| Monitoring EWS | Web Services | HTTP Response | /ews/healthcheck.htm | 200 OK |
| Monitoring EAS | Active Sync | HTTP Response | /Microsoft-Server-ActiveSync/healthcheck.htm | 200 OK |
| Monitoring ECP | Control Panel | HTTP Response | /ecp/healthcheck.htm | 200 OK |
| Monitoring ADS | Autodiscover | HTTP Response | /autodiscover/healthcheck.htm | 200 OK |
| Monitoring OAB | Offline Address Book | HTTP Response | /oab/healthcheck.htm | 200 OK |
Note: You can configure as many Real Server Monitors as you wish but only one can be applied to a Channel/Virtual Service
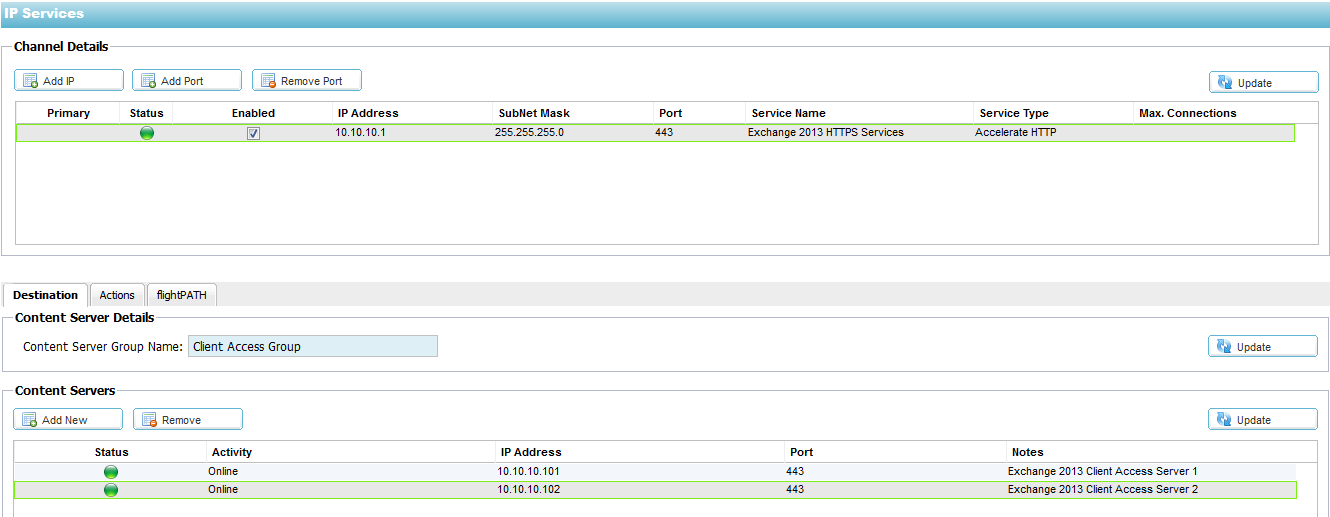
Single Virtual Server with Single CAS group
IP Services
Deploying Edgenexus ALB-X as single virtual server with a single CAS
group for Exchange 2013 HTTP services is the simplest and quickest
approach. Only one real server monitor can be applied, which must therefore be considered a group monitor in this scenario.
To add a new Virtual Server or Channel:
Click on Setup — IP-Services
- In the top Channel Details section, click on Add IP
- A blank row will appear, double click on the IP address column and enter the IP address of your Virtual Server
- Tab to the Subnet Mask column and enter the subnet mask details
- Tab to the Port column and enter 443
- Tab to the Service Name column and enter “Exchange 2013 HTTPS Services”
- Tab to the Service Type and tap down arrow until “Accelerate HTTP” is selected from the drop down box
- Click Update to apply your changes
To add a Client Access Server:
- In the bottom Content Servers section add a server group name called “Client Access Server Group”
- Click Add New
- Double click in the IP Address column and enter the IP address of your Client Access Server
- Tab to the Port and enter 443
- Tab to Notes and enter a name for your client access server
- Click Update to apply
- Repeat for all of your Client Access Servers
Actions Settings:
Apply the following Actions settings to your Virtual Server (Channel)
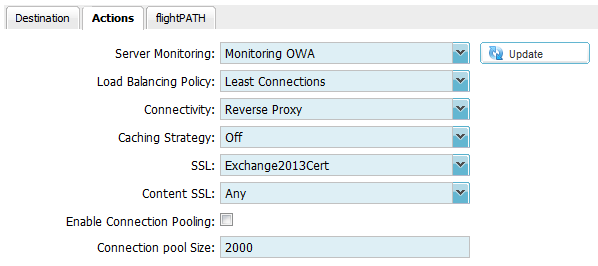
Note: The above screenshot shows “Monitoring OWA” as a server monitor. This must first be configured in the Configure — Content Server Monitor section
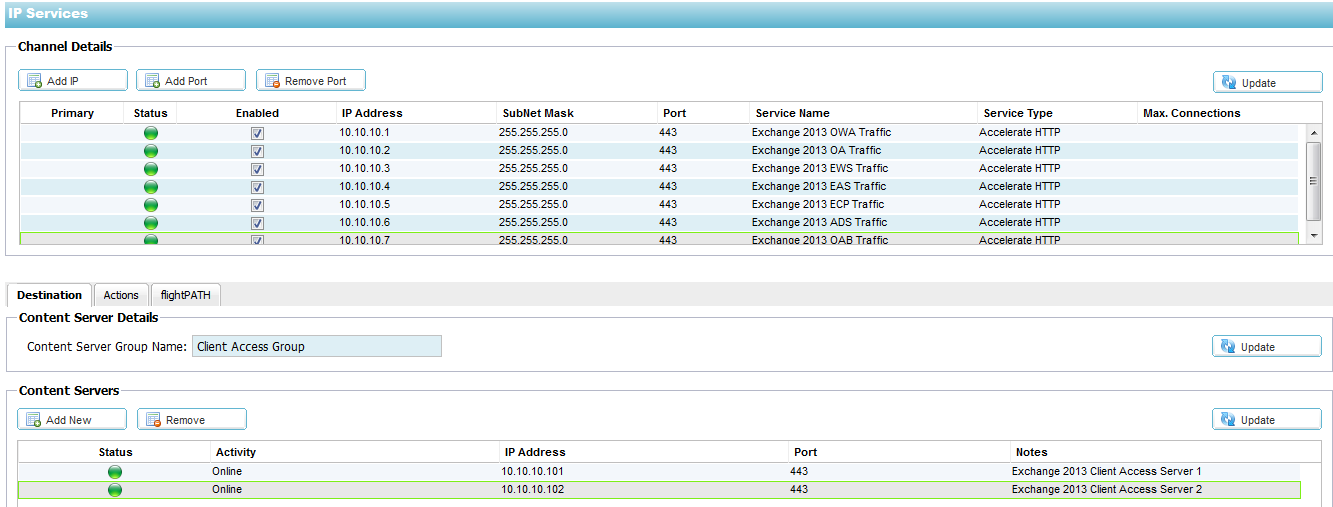
Multiple Virtual Servers with multiple CAS groups
This deployment requires the creation of a unique IP address for each
virtual server. This allows for an individual real server monitor to be
applied for each Exchange 2013 HTTPS service.
To add a new Virtual Server or Channel:
Click on Setup — IP-Services
- In the top Channel Details section, click on Add IP
- A blank row will appear, double click on the IP address column and enter the IP address of your Virtual Server
- Tab to the Subnet Mask column and enter the subnet mask details
- Tab to the Port column and enter 443
- Tab to the Service Name column and enter “Exchange 2013 OWA Traffic”
- Tab to the Service Type and tap down arrow until “Accelerate HTTP” is selected from the drop down box
- Click Update to apply your changes
To add a Client Access Server:
- In the bottom Content Servers section add a server group name called “Client Access Server Group”
- Click Add New
- Double click in the IP Address column and enter the IP address of your Client Access Server
- Tab to the Port and enter 443
- Tab to Notes and enter a name for your Client Access Server
- Click Update to apply
- Repeat for all of your Client Access Servers
Actions Settings:
Apply the following Actions settings to your Virtual Server (Channel)
Note: The above screenshot shows “Monitoring OWA” as a server monitor. This must first be configured in the Configure — Content Server Monitor section. Apply the relevant Server Monitor to the channel.
IMAP4, POP3 & SMTP
By default IMAP4 and POP3 services are disabled in Exchange 2013. To
support clients that use these protocols please see the link below:
http://technet.microsoft.com/en-us/library/jj657728(v=exchg.150).aspx
Front End Transport Service is a new component in Exchange 2013 that
handles all of the inbound and outbound mails of the exchange
organisation.
http://technet.microsoft.com/en-us/library/jj218640%28v=exchg.150%29.aspx
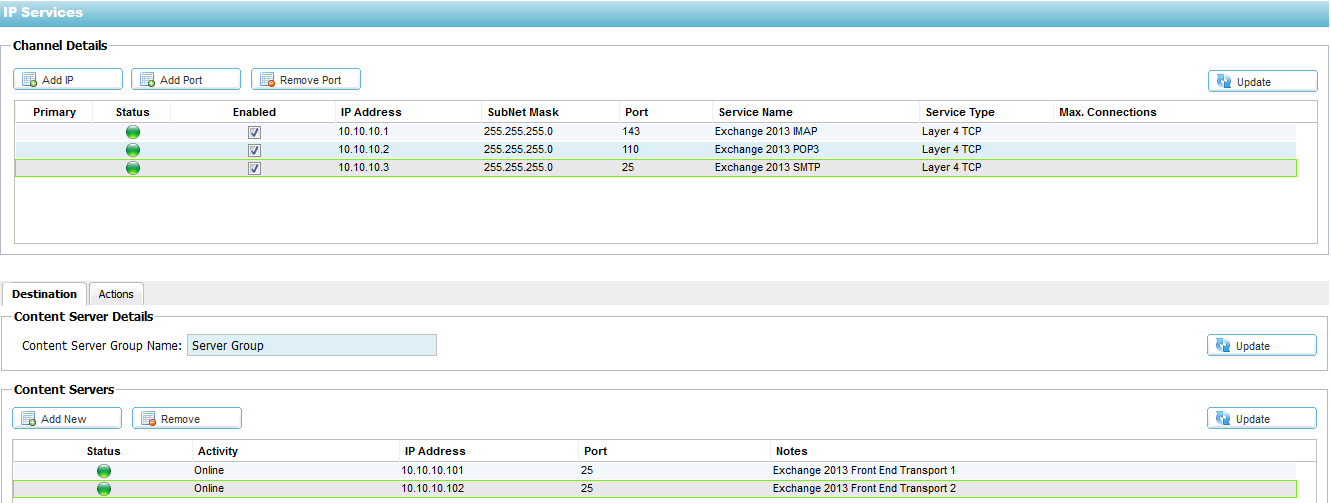
To add a new Virtual Server or Channel:
Click on Setup — IP-Services
- In the top Channel Details section, click on Add IP
- A blank row will appear, double click on the IP address column and enter the IP address of your Virtual Server
- Tab to the Subnet Mask column and enter the subnet mask details
- Tab to the Port column and enter the relevant port
- Tab to the Service Name column and enter “Exchange 2013 IMAP” or “Exchange 2013 POP3” or “Exchange 2013 SMTP”
- Tab to the Service Type and tap down arrow until “Layer4 TCP” is selected from the drop down box
- Click Update to apply your changes
To add a Client Access Server:
- In the bottom Content Servers section add a server group name called “Client Access Server Group”
- Click Add New
- Double click in the IP Address column and enter the IP address of your Client Access Server
- Tab to the Port and enter the relevant port
- Tab to Notes and enter a name for your Client Access Server
- Click Update to apply
- Repeat for all of your Client Access Servers
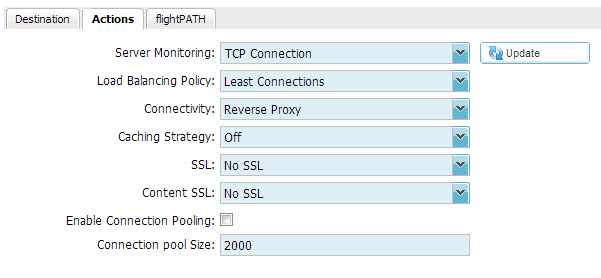
Actions Settings:
Apply the following Actions settings to your Virtual Server (Channel)
Troubleshooting
Further help can be found on the Edgenexus websites
http://www.edgenexus.io/support/
User-guides
Contact Us
We hope you have found this Deployment Guide informative, but if you
need any clarification or further information, please do not hesitate
to get in contact with Edgenexus Support:
|
|
support@jetNEXUS.com |
Phone |
+44 (0870) 382 5529 |
Blog |
http://jetNEXUS.blogspot.com/ |
 Back to Top