Edgenexus ALB-X Exchange 2010 Deployment Guide
Synopsis
Pre-Requisites
Overview
Why Edgenexus?
What is a jetPACK?
Exchange 2010 Description
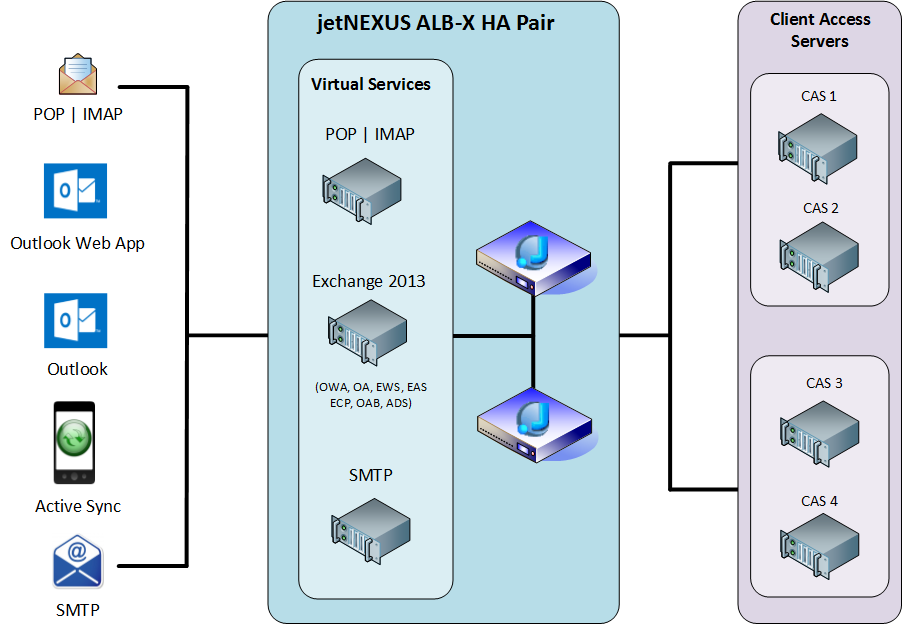
Standard Exchange Diagram
Modifying Exchange 2010
jetNEXUS ALB-X Configuration
Adding a channel
Add another service to a channel
Adding a Content Server
Configuring RPC (End Point Mapper)
Configuring Static RPC/CA/PF (Client Access/Public Folders)
Configuring Static RPC/ADS (Address Book Service)
Configuring HTTPS OWA – Layer 7
Configuring HTTPS OWA – Layer 4
Content Server Monitor
SSL Certificates
TCP Timeout Changes
jetPACK Quick Installation
Troubleshooting
Contact Us
Synopsis
This document explains briefly the concept
of Exchange 2010 and how to use an ALB-X to load balance Exchange 2010
Traffic.
Pre-requisites
The following are general prerequisites and
configuration
notes for this guide:
-
- It is assumed that the reader is a
network administrator or person familiar with networking and general
computer terminology
- It is assumed that the reader is a
-
- You have set-up your Microsoft
Exchange 2010 environment and have installed your Edgenexus
ALB-X application delivery controller
- You have set-up your Microsoft
- When Microsoft refer to a hardware
load balancer (HLB) it is equivalent to the industry term “Application
Delivery Controller” - You are running Software Version 3.55.1 (Build 1559) or later on your Edgenexus ALB-X<span
Overview
The ALB-X is an Application Delivery
Controller (ADC)
sometimes referred to as a next generation load balancer.
This document assumes that you are already
familiar
with using the ALB-X interface.
This document assumes that you are already
familiar with the process of installing Exchange, creating a DAG, and
creating a CAS Array.
Why jetNEXUS?
| Server Health Monitoring | Application layer server health checks, detect and route around problems to eliminate downtime |
|
| Layer 4 & Layer 7 Load Balancing |
Speedy layer 4 load balancing with layer 7 health checks ensure the most efficient load balancing is achieved |
|
| Reverse Proxy | Traffic from external clients is securely proxied by edgeNEXUS ensuring no external client can directly access internal resource |
|
| Session persistence | The CAS array in Exchange 2010 requires session persistence. Edgenexus ALB-X provides IP and Cookie based session persistence |
|
| Compression | Compression is automatically used to accelerate external web and mobile clients |
|
| SSL Re-Encryption | Enables end to end secure encrypted traffic between client and internal resources whilst still being able to provide acceleration and traffic manipulation with flightPATH |
|
| fliightPATH | Our intelligent application layer traffic manipulation engine can be easily configured to redirect OWA clients to the correct service |
What is a jetPACK?
A
jetPACK is a simple text file that you can upload to your appliance
that contains all of the configuration needed to deploy an application
such as Exchange 2013.
For more information on jetPACK – Click Here
Exchange 2010 description
Brief overview of Exchange 2010 load
balancing configuration is provided below:
Outlook Clients
The Outlook clients we have used
during testing are made up of Outlook 2003, Outlook 2007 & Outlook
2010 which send their requests to the CAS.
Client Access Server (CAS) Role
The Client Access Server (CAS) role
accepts connections from a variety of clients to allow them access to
the Exchange Server infrastructure.
Database Availability Group (DAG)
The Database Availability Group (DAG)
is made up of Exchange Server 2010 Mailbox servers that provide
automatic database-level recovery from a database, server, or network
failure.
Standard Exchange 2010
Diagram
Modifying
Exchange 2010 Client Access Servers
To enable load balancing on Exchange 2010 we will need to make some
changes to each of the servers within CAS Array. We need to set static
ports for RPC Client Access service, Address Book service and Public
folders.
By default they use a dynamic RPC port range (6005-59530) for outgoing
connections.
Microsoft recommends you set the RPC Client Access Service and Public Folders to a unique value
between 59531 and 60554. We have used 59534 in our example.
Microsoft recommends you set the RPC Address Book Service to a unique
value between 59531 and 60554. We have used 59535 in our example.
Please click on the following link for instructions:
How to configure Static RPC Ports on
an Exchange 2010
Client Access Server
Edgenexus ALB-X Configuration
Example of Completed Rule
Below you will see the completed set of services.
| Virtual IP address | 192.168.1.247 | The address that Outlook clients should resolve the FQDN to |
| Virtual Service for MAPI clients | 135, 59534, 59535 | Static RPC ports needs for Outlook clients |
| Virtual Service for Outlook Web App |
443 | Secure Outlook Web App port |
| Virtual Service for Redirect | 80 | Used to redirect clients to from http to https and add in the correct /owa path |
| Client Access Server 1 | 192.168.1.215 | Real server address of CAS 1 |
| Client Access Server 2 | 192.168.1.216 | Real server address of CAS 2 |
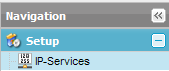
Adding a Virtual Service
The IP Service configuration
screen is the main configuration screen
for load balancing functionality and it can be found in (Setup – IP Services).
- Click Add IP. This will
add a blank row - Double Click on a column to edit.
- Start with the IP Address column and tab to each column in turn
- Click Update once all available columns have been completed
Adding another
Service to the Same Channel
To set up another service on the same IP Address click “Add Port”

This will add another group of settings similar to the first set. This
time you do not need to specify the listening IP or subnet as it has
already been added.
This now allows you to set up the new ports to each of the content CAS
servers.
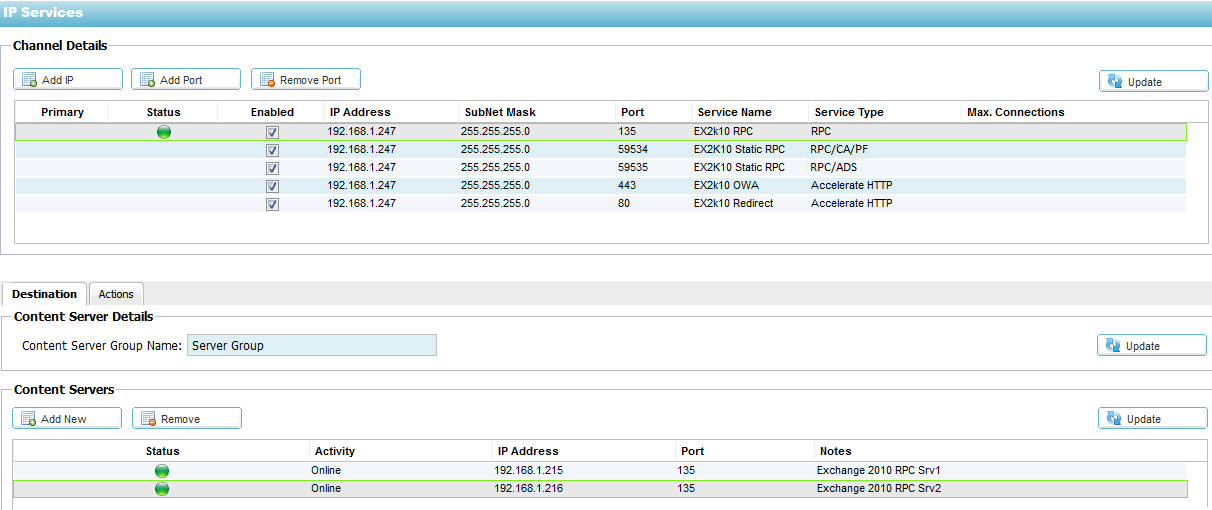
Adding a Content Server
To add a Client Access Server navigate to the bottom section of the
page called “Content Servers”
- Click Add New, this will
add a blank row. - Double Click on the IP Address column and add in your IP Address.
- Tab to the Port column
and enter in the port number for your service - Tab to the Notes section
and add in the name of the client access server.

Configuring RPC
Configure the new channel with the IP details for your new service.
In this example we will configure the following IP details, based on a
One-Armed Configuration.
Channel
Details:
| Primary: | n/a |
| IP Address: | 192.168.1.247 |
| Subnet Mask: | 255.255.255.0 |
| Port: | 135 |
| Service Name: | Exchange 2010 RPC |
| Service Type: | Layer4 |
| Max Connection: | n/a |
Destination:
| Content Server Details: |
Exchange 2010 Client Access Server 1 |
| Content Server IP: | 192.168.1.215 |
| Content Server Port: | 135 |
Actions:
| Server Monitoring: | TCP Connection |
| Load Balancing Policy | IP-Bound (Formerly “IP Based”) |
| Connectivity: | Reverse Proxy (Formerly “Managed”) |
| Cache: | Off |
| SSL: | No SSL |
| Content SSL: | No SSL |
| Enable Connection Pooling: | N/A |
| Connection Pool Size: | N/A |
Configuring Static RPC/CA/PF (Client Access Service & Public Folders)
Configure the new channel with the IP details for your new service.
In this example we will configure the following IP details, based on a
One-Armed Configuration.
Channel Details:
| Primary: | n/a |
| IP Address: | 192.168.1.247 |
| Subnet Mask: | 255.255.255.0 |
| Port: | 59534 |
| Service Name: | Exchange 2010 RPC/CA/PF |
| Service Type: | Layer4 |
| Max Connection: | n/a |
Destination:
| Content Server Details: |
Exchange 2010 Client Access Server 1 |
| Content Server IP: | 192.168.1.215 |
| Content Server Port: | 59534 |
| Notes | `Client Access Server 1 |
Actions:
| Server Monitoring: | TCP Connection |
| Load Balancing Policy | IP-Bound (Formerly “IP Based”) |
| Connectivity: | Reverse Proxy (Formerly “Managed”) |
| Cache: | Off |
| SSL: | No SSL |
| Content SSL: | No SSL |
| Enable Connection Pooling: | N/A |
| Connection Pool Size: | N/A |
Configuring Static RPC/ADS (Address Book Service)
Configure the new channel with the IP details for your new service.
In this example we will configure the following IP details, based on a
One-Armed Configuration.
Channel Details:
| Primary: | n/a |
| IP Address: | 192.168.1.247 |
| Subnet Mask: | 255.255.255.0 |
| Port: | 59535 |
| Service Name: | Exchange 2010 RPC/ADS |
| Service Type: | Layer4 |
| Max Connection: | n/a |
Destination:
| Content Server Details: |
Exchange 2010 Client Access Server 1 |
| Content Server IP: | 192.168.1.215 |
| Content Server Port: | 59535 |
Actions:
| Server Monitoring: | TCP Connection |
| Load Balancing Policy | IP-Bound (Formerly “IP Based”) |
| Connectivity: | Reverse Proxy (Formerly “Managed”) |
| Cache: | Off |
| SSL: | No SSL |
| Content SSL: | No SSL |
| Enable Connection Pooling: | N/A |
| Connection Pool Size: | N/A |
Configuring Exchange HTTPS
(OWA) – Layer 7
Channel Details:
| Primary: | n/a |
| IP Address: | 192.168.1.247 |
| Subnet Mask: | 255.255.255.0 |
| Port: | 443 |
| Service Name: | Exchange 2010 HTTPS |
| Service Type: | Accelerate HTTP |
| Max Connection: | n/a |
Destination:
| Content Server Details: |
Exchange 2010 Client Access Server 1 |
| Content Server IP: | 192.168.1.215 |
| Content Server Port: | 443 |
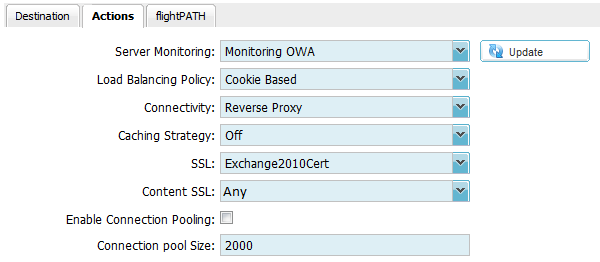
Actions:
| Server Monitoring: | Monitoring OWA |
| Load Balancing Policy | Cookie |
| Connectivity: | Reverse Proxy (Formerly “Managed”) |
| Cache: | Off |
| SSL: | Exchange2010Certificate |
| Content SSL: | Any |
| Enable Connection Pooling: | N/A |
| Connection Pool Size: | N/A |
Configuring Exchange HTTPS
(OWA) – Layer 4
Channel Details:
| Primary: | n/a |
| IP Address: | 192.168.1.247 |
| Subnet Mask: | 255.255.255.0 |
| Port: | 443 |
| Service Name: | Exchange 2010 HTTPS |
| Service Type: | Layer4 |
| Max Connection: | n/a |
Destination:
| Content Server Details: |
Exchange 2010 Client Access Server 1 |
| Content Server IP: | 192.168.1.215 |
| Content Server Port: | 443 |
Actions:
| Server Monitoring: | TCP Connection |
| Load Balancing Policy | IP-Bound (Formerly “IP Based”) |
| Connectivity: | Reverse Proxy (Formerly “Managed”) |
| Cache: | Off |
| SSL: | No SSL |
| Content SSL: | No SSL |
| Enable Connection Pooling: | N/A |
| Connection Pool Size: | N/A |
Content Server Monitor
For Exchange 2010 HTTPS OWA service you can create a Layer 7
application layer health check to ensure a server is capable of serving
content.
Navigate to the Configure –
Content-Server Monitoring section.
- Click Add Records
- A new blank row will be created
- Double Click on the Name column to edit then tab to each subsequent tab and complete each column
as below - This rule name will now appear in the Actions – Monitoring which you can
select to apply to the 443 channel.

SSL Certificates
If you have chosen the option to configure OWA as a layer 7 service you
will need to create or import a certificate in to the ALB-X.
Once you have either imported an existing certificate or created it on
the Edgenexus ALB-X you will then be able to select it from the SSL drop
down within the Actions section.
Please refer to the userguide for more information how to manage SSL certificates.
TCP Timeout Changes
By default the Edgenexus ALB-X has a 90 second timeout for TCP
connections. Whilst this is very efficient for web traffic it is more
desirable to extend this for Exchange 2010 deployment.
Please email support@edgenexus.io with your preferred TCP timeout
value.
Values between 5 Minutes and 2 hours are recommended but we can
customise this to any value you require.
Support@edgenexus.io will send you a custom configuration update file
which you then upload on to the ALB-X. This is a very quick and simple
procedure that can be completed from within the GUI in around 15
seconds.
You can download a 2 hour TCP timeout jetPACK update here
To apply the jetPACK update
- Navigate to Advanced – Update Software – Configuration
- Click Browse (for the file above)
- Click Upload and wait for approximately 15s
- When the screen returns the TCP update has been applied
jetPACK Quick Installation
| The Edgenexus ALB-X can be configured automatically with a Exchange 2010 “jetPACK”, template which is fully-tuned with all of the application-specific settings that you need in order to enjoy optimised service delivery from your ALB-X |
||
| If you supply the virtual IP address and real server IP addresses to support@edgenexus.io we will send you a custom jetPACK that you simply upload to the Edgenexus ALB-X |
||
| The upload can be done via the GUI and will be fully configured in less than 1 minute |
||
| The relevant jetPACK can be applied to multiple Edgenexus ALB-X appliances saving valuable time and eliminating simple mistakes |
||
| To download a jetPACK please visit here |
Troubleshooting
Further help can be found on the edgeNEXUS websites
http://www.edgenexus.io/support
UserGuides
Contact Us
I hope you have found this Deployment Guide informative, but if you
need any clarification or further information, please do not hesitate
to get in contact with edgeNEXUS Support:
|
|
support@jetNEXUS.com |
Phone |
+44 (0870) 382 5529 |
Blog |
http://jetNEXUS.blogspot.com/ |
 Back to Top