Hardware
The Setup—>Hardware configuration page allows you to view and edit the physical interfaces. It also allows you to create a bonded interface. Note that bonding will only work for physical appliances. Bonding should be done on the host Hyper Visor for virtual appliances.
This section is organised in two sections:
Interfaces
The settings on this screen control the network access. The defaults are to fix speed at 100 Mbps and full duplex. This avoids any issue with certain networking devices that have auto-negotiation which re-negotiates too frequently.
The appliance can support speeds from 10 to 1000; for 1000 this should set to auto/auto. If this does not work, set the exact network hardware values.
The speed and duplex setting should only be changed for hardware appliance. Virtual appliances will take their configuration from the underlying hypervisor.
Bonding
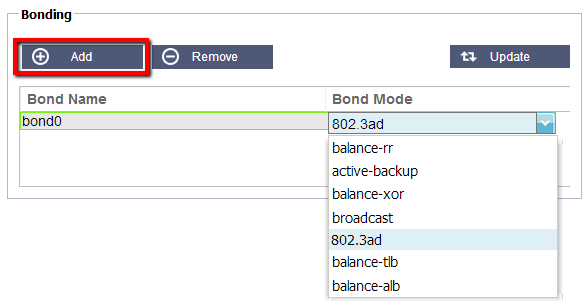
Bonding allows you to aggregate multiple ports into a single group, effectively combining the bandwidth into a single connection. Bonding also allows you to create multi-gigabit pipes to transport traffic through the highest traffic areas of your network. Note: this is only relevant for your hardware version of ALB-X. Do not use bonding for the Virtual Appliance.
Bonding Modes
balance-rr:
Transmits packets in sequential order from the first available slave to the last.
active-backup:
Has one interface which will be active and the second interface will be in standby. This secondary interface only becomes active if the active connection on the first interface fails.
balance-xor:
Transmits based on source MAC address XOR’d with destination MAC address. This selects the same slave for each destination Mac address.
broadcast:
Transmits everything on all slave interfaces.
802.3ad:
Creates aggregation groups that share the same speed and duplex settings. Utilizes all slaves in the active aggregator according to the 802.3ad specification.
balance-tlb:
The Adaptive transmit load balancing bonding mode: Provides channel bonding that does not require any special switch support. The outgoing traffic is distributed according to the current load (computed relative to the speed) on each slave. Incoming traffic is received by the current slave. If the receiving slave fails, another slave takes over the MAC address of the failed receiving slave.
balance-alb:
The Adaptive load balancing bonding mode: also includes balance-tlb plus receive load balancing (rlb) for IPV4 traffic, and does not require any special switch support. The receive load balancing is achieved by ARP negotiation. The bonding driver intercepts the ARP Replies sent by the local system on their way out and overwrites the source hardware address with the unique hardware address of one of the slaves in the bond, such that different peers use different hardware addresses for the server.
Configure Bonding
- Click on Add button on the bonding section and choose which bonding mode you wish to use
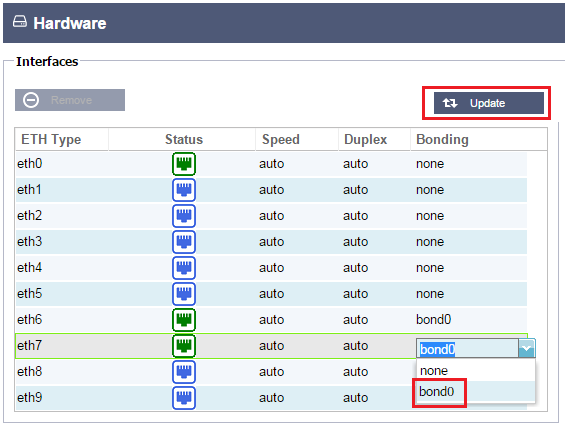
- Assign which interfaces are to be bonded in the interface section. In the example below eth0, eth1 and eth2 are now part of bond0. Whilst Eth0 remains on its own as the management interface


Adapter Status
 -Adapter Up
 – Adapter Down
 – Adapter Unplugged
 – Adapter missing
IP Addressing
Now that you have added your bond you can go to the appliance section to add the IP address and policy routing details
 Back to Top