How to Load balance ADFS
This document briefly explains the concept of ADFS (Active Directory Federation Services) and how to configure a Edgenexus ALB-X to load balance ADFS traffic. This is particularly useful for running an hybrid exchange setup with Office 365.
Overview
Increasingly enterprises are moving to cloud-based services such as Office 365. Microsoft’s Active Directory Federation Services (ADFS) solution provides seamless access to resources outside the enterprise. To ensure high-availability, performance and scalability Edgenexus ALB-X can be deployed to load balance the Internal AD FS Servers and the Proxy AD FS Servers.
ADFS Description
AD FS is a server role in Windows Server 2008, 2012, 2012 R2 and 2018 that provides Web single-sign-on (SSO) technologies to authenticate a user to multiple Web applications over the life of a single online session.
Internal ADFS Server Farm
The Internal Server Farm authenticates users to the Active Directory and provides the user with a signed security token and a set of claims for the external ADFS resource partner.
ADFS Proxy Server Farm
AD FS proxy servers are deployed on your perimeter network for remote internal users to access the ADFS farm from the internet without exposing the ADFS servers to the outside. To ensure high-availability, performance and scalability Edgenexus ALB-X can be deployed to load balance two or more ADFS proxy servers.
External ADFS Resource Partner Server
This server resides in the resource partner organisation. Its role is to issue security tokens to users based on a security token that is issued by the Internal AD Federation Server.
Load Balancing the Internal AD FS Server Farm
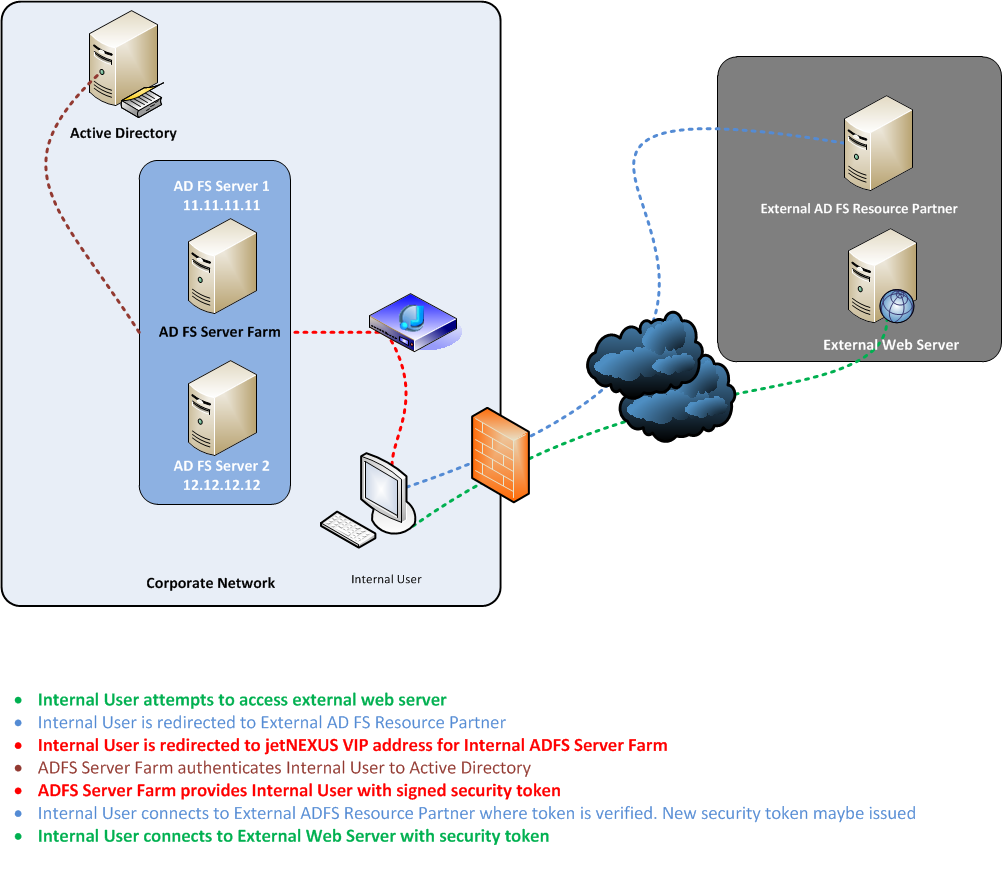
Diagram 1.0 – Internal load balancing ADFS Environment
Load Balancing AD FS Proxy Server Farm
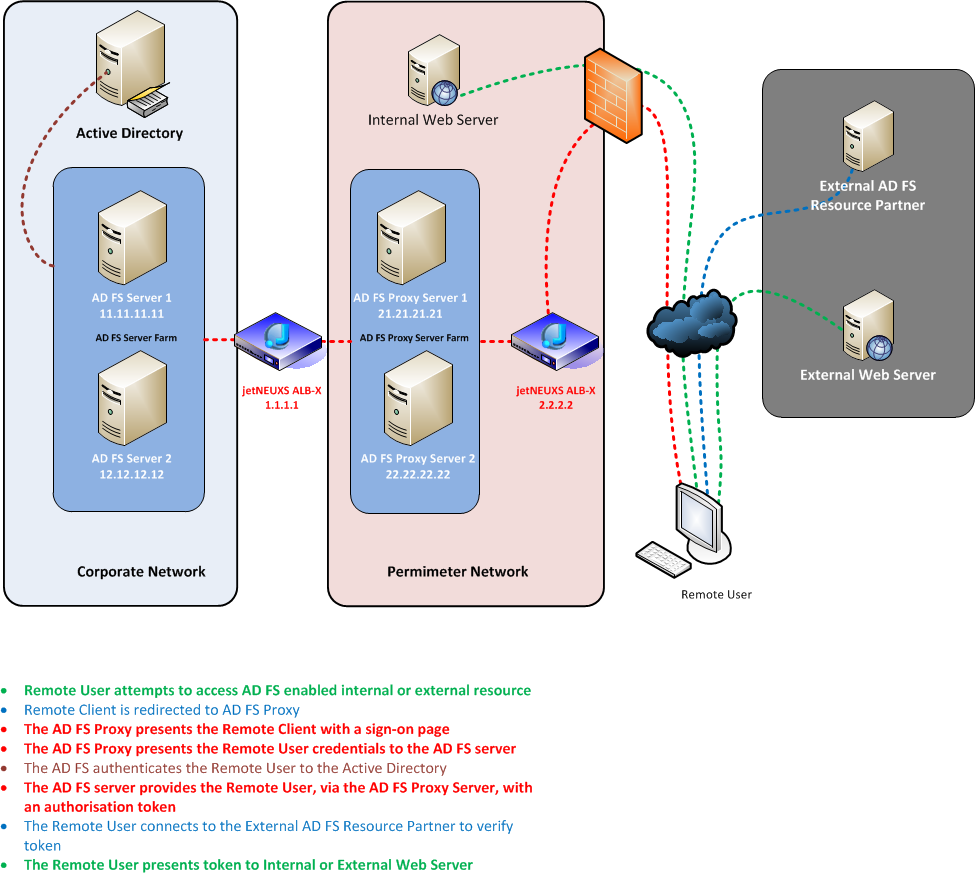
Diagram 2.0 – ADFS Proxy Server Environment
AD FS Server Farm
Edgenexus ALB-X Configuration
Pre-Requisites
It is assumed that you have configured the Edgenexus ALB-X sufficiently enough to be able to access the web console GUI.
If you need assistance please refer to the Edgenexus ALB-X Installation Manual located in your download zip file or contact support@edgenexus.io for the latest copy.
You can also watch the tutorial videos on our web site:
https://www.edgenexus.io/alb-x-tutorials.html
It is also assumed that the ADFS Proxy Server Farm has been deployed and configured as per the Microsoft deployment guide.
There are two options for SSL with the ADFS Proxy Server Farm that can be provisioned with the Edgenexus ALB-X.
-
- SSL Pass-Thru: This is the fastest method whereby encrypted traffic flows from client directly to one of the ADFS proxy servers. SSL certificates do not need to be added to the Edgenexus ALB-X
- SSL Bridging: If the client connectivity benefits from compression and layer 7 server health monitoring then this method is available. SSL certificate must be installed on the Edgenexus ALB-X appliance.
IP Services
- First we need to add a Virtual IP Address that will represent our AD FS servers.
-
- Click “IP-Services” from within the “Setup” section of the “Navigation” page
- Click “Add IP” and fill out each column in turn as per diagram 3.0. Note that you must use your own IP address and subnet mask. Click “Update”
- Now we must add our AD FS server details in the “Content Server” section
-
- Click “Add New” and add in the real IP address of each AD FS server in your server farm along with the port number 443
- Click “Update” when you have complete all AD FS server details
 Diagram 3.0 – IP Services Example
Actions – Basic
- Server Monitoring: determines whether a server is ‘healthy’ and capable of serving content
- As we have chosen “Layer4” for our service the best method is “TCP Connect”
- Load Balancing Policy: various methods determining which AD FS server is used for each connection
- AD FS in this deployment does not require persistence, so the best method to choose is “Least Connections”
- Connectivity: specify which connectivity mode
- Select “Managed” from the drop down list. This means the ALB-X is acting as a reverse proxy.
- Caching Strategy: apply a caching strategy to the channel
- Leave this set to “Off”
- Client Side SSL Certificate: apply a certificate to the client/browser side connections
- As this deployment is using SSL Pass-Thru please leave this set to “No SSL”
- Content Server SSL Certificate: accept a certificate from the content server
- As this deployment is using SSL Pass-Thru please leave this set to “No SSL”
- Enable Connection Pooling: N/A
- Please leave this un-ticked
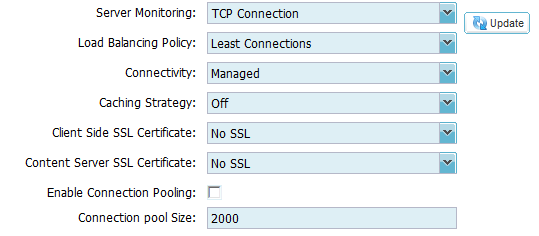
Diagram 3.1 Basic settings
AD FS Proxy Server Farm
Edgenexus ALB-X Configuration
Pre-Requisites
It is assumed that you have configured the Edgenexus ALB-X sufficiently enough to be able to access the web console GUI.
If you need assistance please refer to the Edgenexus ALB-X Installation guide.
You can also watch the tutorial video’s on our website:
https://www.edgenexus.io/alb-x-tutorials.html
It is also assumed that the ADFS Proxy Server Farm has been deployed and configured as per the Microsoft deployment guide.
There are two options for SSL with the ADFS Proxy Server Farm that can be provisioned with the Edgenexus ALB-X.
-
- SSL Pass-Thru: This is the fastest method whereby encrypted traffic flows from client directly to one of the ADFS proxy servers. SSL certificates do not need to be added to the Edgenexus ALB-X
- SSL Bridging: If the client connectivity benefits from compression and layer 7 health checking then this method is available. SSL certificate must be installed on the Edgenexus ALB-X appliance.
IP Services (SSL Pass-Thru)
- First we need to add a Virtual IP Address that will represent our AD FS proxy servers.
-
- Click “IP-Services” from within the “Setup” section of the “Navigation” page
- Click “Add IP” and fill out each column in turn as per diagram 4.0. Note that you must use your own IP address and subnet mask. Click “Update”
- Now we must add our AD FS Proxy server details in the “Content Server” section
-
- Click “Add New” and add in the real IP address of each AD FS server in your server farm along with the port number 443
- Click “Update” when you have complete all AD FS server details

Diagram 4.0 – IP Services Example
Actions – Basic (SSL Pass-Thru)
- Server Monitoring: determines whether a server is ‘healthy’ and capable of serving content
- As we have chosen “Layer4” for our service the best method for is “TCP Connect”
- Load Balancing Policy: various methods determining which AD FS server is used for each connection
- AD FS in this deployment does not require persistence so the best method to choose is “Least Connections”
- Connectivity: specify which connectivity mode
- Select “Managed” from the drop down list. This means the ALB-X is acting as a reverse proxy.
- Caching Strategy: apply a caching strategy to the channel
- Leave this set to “Off”
- Client Side SSL Certificate: apply a certificate to the client/browser side connections
- As this deployment is using SSL Pass-Thru please leave this set to “No SSL”
- Content Server SSL Certificate: accept a certificate from the content server
- As this deployment is using SSL Pass-Thru please leave this set to “No SSL”
- Enable Connection Pooling: N/A
- Please leave this un-ticked
Diagram 4.1 – Basic Settings
IP Services (SSL Bridging)
- First we need to add a Virtual IP Address that will represent our AD FS proxy servers.
-
- Click “IP-Services” from within the “Setup” section of the “Navigation” page
- Click “Add IP” and fill out each column in turn as per diagram 5.0. Note that you must use your own IP address and subnet mask. Click “Update”
- Now we must add our AD FS Proxy server details in the “Content Server” section
-
- Click “Add New” and add in the real IP address of each AD FS server in your server farm along with the port number 443
- Click “Update” when you have completed all AD FS Proxy server details
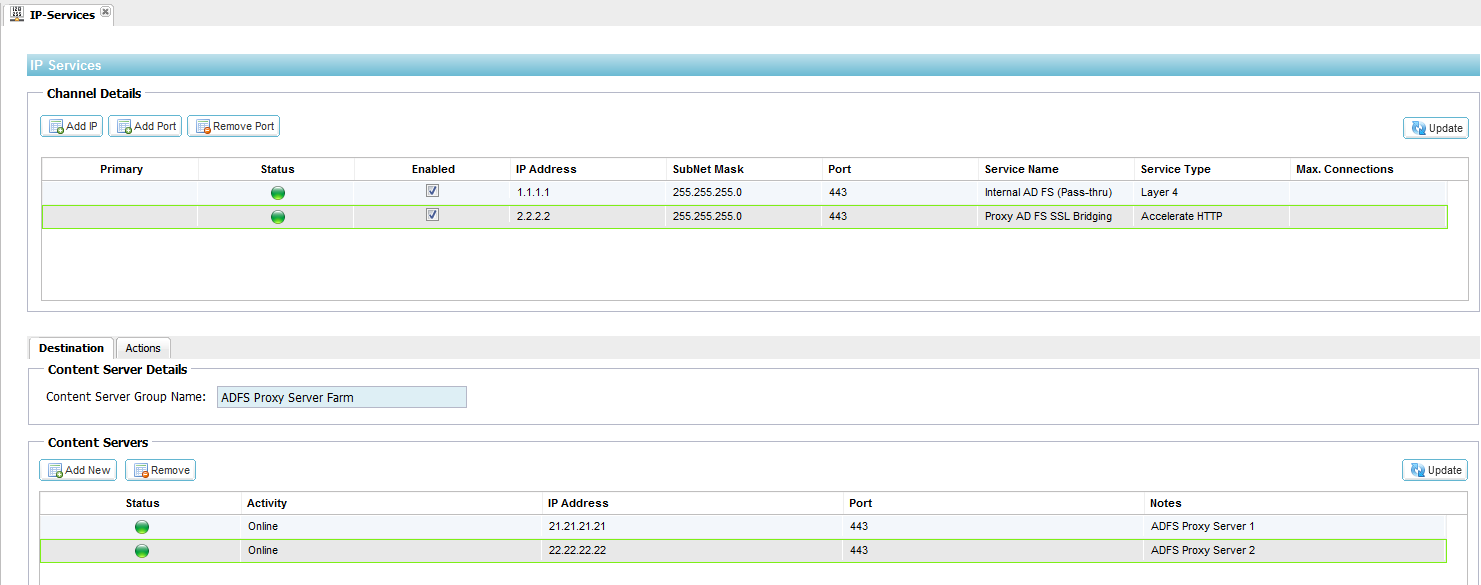
Diagram 5.0 – IP Services Example
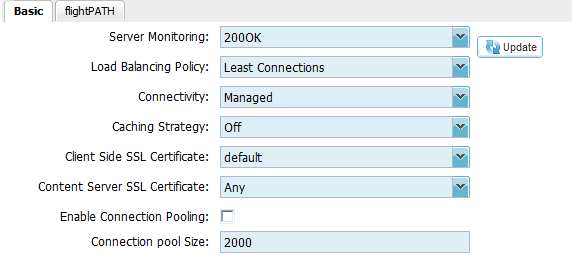
Actions – Basic (SSL Bridging)
- Server Monitoring: determines whether a server is ‘healthy’ and capable of serving content
- As we have chosen “Accelerate HTTP” for our service the best method for this is “200OK”. See diagram 5.1
- Load Balancing Policy: various methods determining which AD FS server is used for each connection
- AD FS in this deployment does not require persistence so the best method to choose is “Least Connections”
- Connectivity: specify which connectivity mode
- Select “Managed” from the drop down list. This means the ALB-X is acting as a reverse proxy.
- Caching Strategy: apply a caching strategy to the channel
- Leave this set to “Off”
- Client Side SSL Certificate: apply a certificate to the client/browser side connections
- As this deployment is using SSL Bridging we have chosen our “default” certificate. See diagram 3.1. You can choose your own certificate once it has been imported or created. Please refer to the user manual to add your own custom certificates to the Edgenexus ALB-X.
- Content Server SSL Certificate: accept a certificate from the content server
- As this deployment is using SSL Bridging please set this to “ANY”
- Enable Connection Pooling: N/A
- Please leave this un-ticked